
Introduction
Adding user accounts, changing passwords, and editing other user settings is something that has to be done on any computer system, and can be a bit complicated in Windows 8. In Windows 8, there are now three different places to change user settings. To make things even more complicated, each place allows different settings to be changed so it is likely that a user will need to visit two or even all three of these locations to fully configure a user account. Basic settings such as editing passwords and creating new users can be done through the Start -> PC Settings, but if you want to delete an account, change the account name, or change the account type you have to go through either Control Panel -> User Accounts or Control Panel -> Manage Accounts.
To help you get right to what you want to do, we are going to provide quick links to allow you to get right to what you want to achieve. If you jump directly to a link, be sure to first visit either the Accessing Start -> PC Settings, Accessing Control Panel -> User Accounts, or Accessing Control Panel -> Manage Accounts to first find out how to get to the location the link is referencing.
|
Start -> PC Settings |
Control Panel -> User Accounts |
Control Panel -> Manage Accounts |
|
| Add/Remove/Change Password [Alt]* |
|
|
|
| Add Standard Account |
|
|
|
| Add Administrator Account |
|
|
|
| Delete Account |
|
|
|
| Change Account Name [Alt]* |
|
|
|
| Change Account Type [Alt] |
|
|
|
| Change UAC Settings |
|
|
|
| Switch to Local/Microsoft Account |
|
|
|
| Change Family Safety Settings |
|
|
|
*Local accounts only. Microsoft account setting can be changed through online account settings
Out of all the options shown in the chart above, the only one that is not possible to directly achieve is adding an Administrator account. It is certainly still possible, but you need to first add a Standard account via the Start -> PC Settings, then go into the Control Panel -> User Accounts and change the account type to be an Administrator account.
Note that with the exception of editing the password settings for your account and switching from a local/Microsoft account, everything in this article requires administrator privileges.
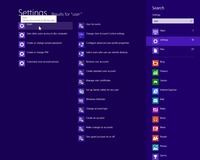 Start -> PC Setting can be accessed either by performing a settings search through the Start interface or by manually navigating to it with the mouse.
To search, either type "user" while on the main Start interface, then change the search method to "Settings" or directly search for settings by using the hotkey combination "WinKey+W" before typing "user". When the results come up, click on the top-left "Users" result that has the gear icon next to it.
To manually navigate to the Start -> PC Settings, simply follow the four steps shown below:
|
|
|
| Move the cursor to the top-right corner of the screen | Click on the Settings icon on the charm bar |
|
|
|
| Click on "Change PC Settings" | Click on "Users" |
From here, you can perform the following actions:
| Add/Remove/Change Password: To alter the account password, click on either "Create a password" if there is no current password or "Change your password" if a password already exists and follow the on-screen instructions. | ||
|
|
|
|
| Add Account: To add a Standard account, click on "Add a user". If you want to add a Microsoft Account, follow the on-screen instructions. If you want to add a local account, click on "Sign in without a Microsoft account" then click "Local Account" | ||
|
|
|
|
| Switch to Local/Microsoft Account: To change the logged in user to or from a Microsoft account, click on either "Switch to a local account" or "Switch to a Microsoft account" and follow the on-screen instructions. | ||
|
|
|
|
 Control Panel -> User Accounts can be accessed either by performing a settings search or by manually navigating to it with the mouse.
To search, either type "user" while on the main Start interface, then change the search method to "Settings" or directly search the settings by using the hotkey combination "WinKey+W" before typing "user". When the results come up, click on the "Users" result at the top of the right-hand column.
To manually navigate to the Start -> PC Settings, simply follow the steps shown below:
|
|
|
| Move the cursor to the bottom-left corner of the screen and right-click with the mouse. Click on "Control Panel" on the menu that comes up. | Click on "User Accounts and Family Safety" |
|
|
|
| Click on "User Accounts" |
From here, you can perform the following actions:
| Change Account Name: To change the user account name, click on "Change your account name" and input the desired account name. Note that if you are using a Microsoft account, this option is not available. To change the account name of a Microsoft account, you need to log in to your Microsoft account and change the name online. | ||
|
|
|
|
| Change Account Type: To change the account type, click on the "Change your account type" and select the desired account type. | ||
|
|
|
|
| Change UAC Settings: To change the UAC settings, click on the "Change User Account Control settings" and select the desired level of notifications. | ||
|
|
|
|
Accessing Control Panel -> User Accounts. Once you have done so, follow the steps below to access the advanced options for an account.

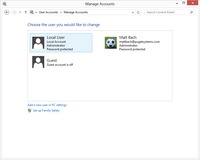
Click on "Manage another account"
Select the account you want to edit
|
|
|
|
| Click on "Manage another account" | Select the account you want to edit |
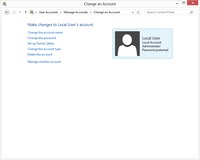
Once you get to the final screen, you can perform the following actions:
| Add/Remove/Change Password: To change the account password, click on "Change the password" and input the desired password. Note that if you are using a Microsoft account, this option is not available. To change the password of a Microsoft account, you need to log in to your Microsoft account and change the name online. | ||
|
|
|
|
| Delete an Account: To delete an account, click on "Delete the Account". Note that this can only be done to other accounts and not the one currently logged in. So if you want to delete your current account, you will need to either log in to another account or create a new account with administrator privileges. | ||
|
|
|
|
| Change Account Name: To change the user account name, click on "Change your account name" and input the desired account name. Note that if you are using a Microsoft account, this option is not available. To change the account name of a Microsoft account, you need to log in to your Microsoft account and change the name online. | ||
|
|
|
|
| Change Account Type: To change the account type, click on the "Change your account type" and select the desired account type. | ||
|
|
|
|
| Set up Family Safety: To configure the Family Safety settings, click on the "Set up Family Safety". Through Family Safety, you can get reports of user activities, set time limits, app restrictions and more. | ||
|
|
|
|