Table of Contents
What’s the point of this article?
By default, Windows will automatically select what it deems the most useful audio device based on a number of criteria Microsoft has determined but if your system isn’t defaulting to the audio device you want, use the below instructions to FORCE IT! 🙂
Audio Connection Examples
There are quite a few different audio connection options so let's cover a few of the most common!
This is the analog 3.5mm jack, the single most common connection used for most audio devices such as external speakers, headphones and amplifiers. Audio signals in analog cables are transmitted via electricity and are limited to transmitting two-channel stereo sound. If you have a trio of 3.5mm cables bundled together, you can mimic 5.1 surround sound using something called “6-Channel Stereo,” but this will be far inferior to what you can do with digital. While analog audio cables are subject to radio and electrical interference just by being shoved and moved around, if you have an intelligent cable setup, this shouldn’t be a problem. Reach out to Puget Systems Support if you have questions about how to set that up!
This is a digital optical cable or TOSLINK cable. The best way to describe optical audio (which uses the S/PDIF interface to transmit data) is that it sends the sound signal digitally via fiber optic cables, using light in a plastic or glass tube to carry its signal rather than copper wiring. The main benefit of digital audio cables is 5.1 surround sound and support for established Dolby formats like Dolby True Surround and Dolby Digital.
Audio Port Examples
Below is a picture of a standard motherboard audio connection panel where you will be inserting the audio connection.
PORT 12: This is the standard analog 3.5mm panel with all the available ports. The lower center (marked in RED) is typically the primary audio out port but your configuration may vary depending on the manufacturer. The input ports are also most commonly colored green but are occasionally not colored at all so check your Puget Information Booklet for accurate identification.
PORT 11: This is the digital optical input (TOSLINK) and is used to connect amplifiers or receivers, Digital Audio Controllers (DAC), and some extremely high quality speaker systems. The digital output provides
Adjusting Default Audio Device using the ‘Sound flyout’
Windows 10 introduced the ‘Sound flyout’ which is a contextual menu available from the sound icon in the bottom right corner of your screen in the system tray
- Click the sound volume icon in the system tray
- Select the UP arrow on the Sound flyout
- Pick your desired default audio device
Adjusting Default Audio Device in Settings
- Open “Settings”
- Go to “System” then select “Sound” on the right side
- Use the dropdown list to “Choose your output device”
Success! Now your default audio device is set and audio should play perfectly.
Setting Default Audio Device using the classic Sound window
Microsoft has elected to include the original Sound window and devices can be adjusted that way as well.
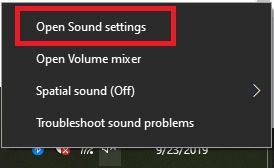
- Right click the “Sound” icon in the system tray at the bottom right of your screen
- Select “Open Sound settings”
- The Settings window will open, on the far right side select “Sound Control Panel”
- Select the device you wish to use and at the bottom of the window select “Set Default”
This will adjust your audio output and set it as default so it holds during restarts of the system
Need help with your Puget Systems PC?
If something is wrong with your Puget Systems PC. We are readily accessible, and our support team comes from a wide range of technological backgrounds to better assist you!
Looking for more support guides?
If you are looking for a solution to a problem you are having with your PC, we also have a number of other support guides that may be able to assist you with other issues.