Table of Contents
Trouble installing updates? We have a solution!
Windows 10 updates can be challenging at times but being fully up to date is extremely important; we are here to help resolve issues as best we can. We have noticed some updates failing to install and after a system restart the update often shows an error indicating it failed to install.
There doesn’t appear to be a specific update but instead any recent update has the potential to encounter this error. There is a relatively simple fix we can perform in order to force the update to install thereby maintaining your security and stability. This article will walk you through some common fixes but as always if you have any questions or run into issues please don’t hesitate to reach out, we are here to help!
Option 1 – Restarting BITS and Windows Event log services
To resolve this problem, let’s try restarting Background Intelligent Transfer Service (BITS). Additionally, we can restart the Windows event log. The process is lengthy but frequently solves a plethora of update issues and common errors.
Step 1:
In the lower left corner, click the Start menu icon (Windows icon) and immediately start typing to search; there’s no need to click anywhere else, it will automatically search
Step 2: Type “services.msc”
Step 3: The best match should be “Services.msc”, right click that and select “Run as Administrator”
Step 4: Find “Background Intelligent Transfer Service”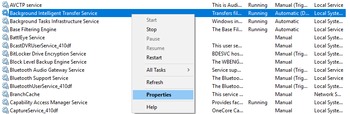
Step 5:
Right-click and open “Properties”
Step 6:
On the General Tab locate the Startup type and set to “Automatic”
Step 7: If BITS is stopped, right click and select “Start”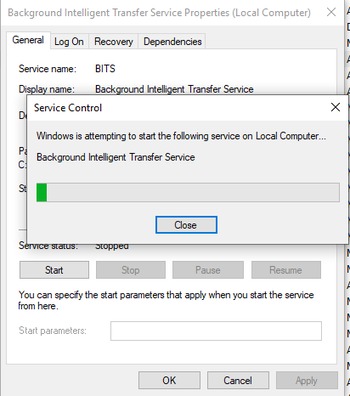
Step 8:
Confirm the selection and close the window
Option 2 – Running SFC and DISM scans
If restarting BITS did not resolve the issue we will want to perform a System File Checker (SFC) and Deployment Image Servicing and Management (DISM) scan to check system files, repair any errors and verify system services and settings. To do this, follow the instructions below then restart the computer and attempt to install Windows updates again.
Step 1:
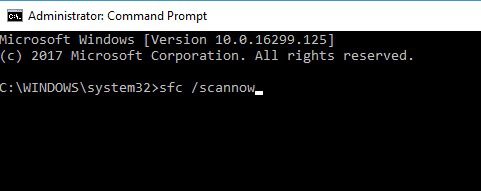
In the lower left corner RIGHT click the Start menu icon then select “Windows PowerShell (Admin)”. On some Windows 10 versions you will instead see “Command Prompt (Admin)” and that will work equally well
Step 2:
In the window that opens input the following command then press enter to run: sfc /scannow
Step 3:
System File Checker will now run and usually only takes about 15min but depending on your system specs it may take longer, be patient and let it run completely. Once finished you will see a screen like this. If the scan found any issues it will automatically repair them
Step 4:
Restart the computer and attempt to update Windows again. If the update fails and you see an error again move on to step 5 to perform a DISM scan
Step 5:
Open Powershell or Command prompt again (Admin) and input the following command then press enter to run: DISM /Online /Cleanup-Image /RestoreHealth
Step 6:
The DISM scan should take about 20 minutes or more and once finished you will see the following screen. Just as the SFC scan can automatically resolve errors the DISM scan will fix any issues it finds and report which files/services were fixed within the end of scan report
Step 7:
Restart the computer and attempt to update Windows again
Need help with your Puget Systems PC?
If something is wrong with your Puget Systems PC. We are readily accessible, and our support team comes from a wide range of technological backgrounds to better assist you!
Looking for more support guides?
If you are looking for a solution to a problem you are having with your PC, we also have a number of other support guides that may be able to assist you with other issues.