Table of Contents
Windows is Trying to Get You to Upgrade
As of late, Microsoft's gone to new heights with their Windows 10 upgrade offer. Why they've even gone so far as to push the issue on those folks who would rather not upgrade to Windows 10 at all! It's a bit of a frustrating scenario, and it makes you wonder what you can do to protect yourself. You've basically got three options in this scenario.
1) You can block the upgrade via a third-party utility.
There's a wonderful free utility called Never10 available. Running this utility will allow you to turn off the Windows 10 upgrade prompts and should stop Windows from trying to upgrade to 10 at all. You'll want to restart the computer after running it to make sure that the settings are saved.
Another option is the GWX Control Panel utility. (Click the * Download Stand-alone * option.) I've had at least one case where Never10 didn't work for some reason, but the GWX Control Panel did.
2) Manually block the upgrade.
Maybe you don't trust running a third party utility. That's definitely understandable. It's a little more involved, but you can block the upgrades via a couple of Group Policy registry keys. To do that, you want bring up the Registry Editor and change a couple of keys. To bring up the Registry Editor, press the Windows key and the R key at the same time, also known as press WIN+R. You'll get a Run dialog. Type in "regedit" and press enter. Windows will prompt you asking if you're sure you want to start it. Click "Yes".
From here, you can find the Windows registry settings to disable the Windows 10 upgrade. There are two entries that need to be changed.
To start with the first one, expand HKEY_LOCAL_MACHINE, then expand SOFTWARE, expand Policies, then Microsoft, then Windows, and finally click on Gwx. If Gwx doesn't exist under the Windows folder, then right click Windows and click New->Key. Type in "Gwx" in the newly created entry, then click on Gwx. Note that you'll probably need to move the bottom slider that comes up so you can read the folder names as you expand them. In the right pane, you will usually see a listing called "DisableGwx". If it's there, right click on it and change the Value Data entry to "1". If it's not, then right click in the empty space in the right pane, highlight over New and select DWORD (32-bit) Value. A new key will appear. Type in "DisableGwx" and press enter. Then right click the DisableGwx key and make sure the Value data is set to "1". It should look like the picture below.
For the second key, you want to traverse things the same as before, but to a slightly different location. It goes as follows:
HKEY_LOCAL_MACHINE->SOFTWARE->Policies->Microsoft->Windows->WindowsUpdate
Again, if you need to, right click on the "Windows" folder, then select New->Key and type in "WindowsUpdate". Then click on WindowsUpdate. In the right panel, either find the "DisableOSUpgrade" key and change the Value data to 1 or right click, go to New->DWORD (32-bit) Value, and type in "DisableOSUpgrade", then right click it and change the Value data to 1. You can see the example below.
After doing that, just close the Registry Editor and restart the computer! Make sure you type anything in exactly as it's written, which means no spaces and that the capital letters are the same. If you don't make it the same, it's likely it won't work.
Finally, you have option three!
3) Give Windows 10 a try!
Most folks reading this probably won't want this option, but it's definitely viable. Despite some annoyances, it's a pretty solid OS. Yes, it's different, and if you do want to upgrade, make sure you backup everything first, but it's still worth doing if you're interested. The good news is, if you do upgrade, you've got an out. Which brings me to the next section…
But Windows 10 Already Forced Its Way on My System!
Okay, so somehow you got Windows 10 on your system. What do you do now? You can live with it, if you want. But there's another option. You can revert back to your previous version of Windows!
Yes, for up to thirty days, you can revert back to Windows before the upgrade. After thirty days, it won't let you do it again, but you've at least got a grace period. I do recommend backing up any important files before doing it. It should work fine, but there's a tiny bit of risk any time you make a system-wide change like this, so better safe than sorry.
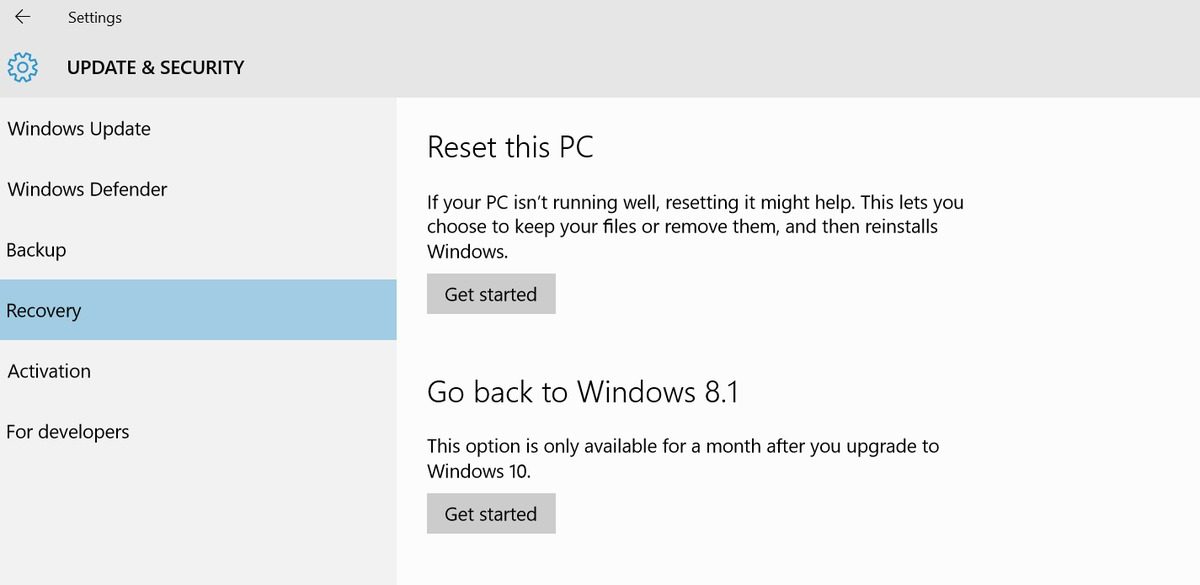
To do the revert, go to the Start Menu at the lower left and click on it. Then click Settings from the menu. Click on Update & Security from the resulting window, and finally, choose "Recovery" from the side menu. You'll be presented with something like the image below. Click on the Get Started button underneath "Go back to Windows 7/8.1".
That's it! It's pretty straightforward. But let's say you can't revert back or you've wanting to stick with Windows 10, but you're having problems. Well continue forward!
Driver Problems
Things usually work fine, but on occasion you'll see problems with either nVidia or Intel's drivers. If you're using an nVidia card and having issues, you might get a blank display or graphical corruption. Unfortunately, this can be difficult to fix, as it requires booting into Safe Mode. To do that, you can try holding down Shift-F8 or just F8 during starting to see if you get Safe mode, but it's a bit of a long shot. You can also try plugging into your onboard video to see if you get video from there. If neither of those options work, you might need to call us up for help in that case. If you can get into Safe Mode or get display, you'll want to download the latest video driver for your card at nVidia.com.
1. Just download that driver and save that to your desktop. If you're not sure where it is, it's probably in your Downloads folder.
2. Once that's done, run it. During the install process, choose "Custom (Advanced)" when it comes up.
3. In the next screen, check the box that says "Perform a clean installation".
4. In addition, unless you are a gamer, uncheck the "GeForce Experience" box. (You can leave it enabled, but we usually disable it.)
5. At this point, just click next through until the end. The system may restart once or more during the install.
Another common issue with Intel's video drivers. In this case, you'll typically just get a background or black screen, but the mouse will work. If that happens, you've got a phantom monitor. You can try disabling the iGPU multi-monitor functionality. However, this issue is usually fixed in the latest version of Intel's video drivers. Just type in your CPU model, and it should give you the latest video card driver in the list of options. If you're not sure what to download, you can always just call us up or email and ask!
The final driver issue we sometimes see is the Intel network controller driver. It doesn't happen every time, but it can happen, so you might consider downloading this driver ahead of time or from another computer. Here is where you can get the latest Intel network driver for our systems, as I write this. Just download that (you probably want the 64-bit version), copy it to the system, and run the installer. It will update the driver. Restart the computer and typically your issues will be cleared up!
Problems With My User Account
So this last section covers two scenarios. One is that you can't log in. One of the changes in Windows 10 is that it often links your Windows login with your Live account, if you have one. If this happens, you need to login with your Windows Live account. If you've got the password for that, try it! Odds are good, you'll be able to login. If you don't, things will be a little tougher. In that case, you can go to the Windows Live Password Reset page. You'll probably need to do it on another computer. Reset the password, then try logging in with the new password. With any luck, that'll get you back in!
The other issue we get is with folks who have broken Start menus after upgrading to Windows 10. Unfortunately, I've yet to find a reliable fix for this. It's a very rare issue, but if it happens, you only have one choice – make a new user profile. Microsoft's got a great guide for that here, but you can't do it without bringing up the Settings panel, and it needs the Start menu working! There is a workaround, though. Press Windows Key+R at the same time to bring up the Run dialog. Type in "ms-settings:" (make sure to include the colon) and press enter. The Settings panel will come up.
Select Accounts from the panel, then select Family & other users from the side panel. Finally, click Add someone else to this PC. Click "I don't have this person's sign-in information" at the bottom. On the next page, click "Add user without a Microsoft Account." Fill in the User name and password info you want (note, it has to be different from your current one). Then click "Next". You will see the new user listed much the same way you see "Test user" listed in the image below. You want to click on the new user, then click "Change account type." Select Administrator from the drop-menu, then click OK. Restart your computer and you can login to the new user account!
That will get you back up and running. I do recommend backing up any important information from the old user account, including any pictures, music, movies, or what have you. Any program settings will probably have to be setup again, but Windows should work properly again. Once you've saved everything you need, you can remove your old user account by bringing up Settings again, going to Accounts, and choosing Family & other users. From there, you just click on the old account name and Remove it. You'll get prompted that doing so will remove any data for the account, so be sure you've backed everything up before doing it!
Need help with your Puget Systems PC?
If something is wrong with your Puget Systems PC. We are readily accessible, and our support team comes from a wide range of technological backgrounds to better assist you!
Looking for more support guides?
If you are looking for a solution to a problem you are having with your PC, we also have a number of other support guides that may be able to assist you with other issues.