Table of Contents
Welcome to the companion guide for our Docker App Packs announcement article. This guide will walk you step-by-step through installing and configuring our tailored AI environments on your Puget Systems workstation.
Prerequisites
- Operating System: Ubuntu 24.04 LTS
- Hardware: Any modern x86_64 system (an NVIDIA GPU with CUDA 12.6+ is required for the accelerated flavors)
- Access: Sudo privileges for system package installation
Step 1: Run the One-Line Installer
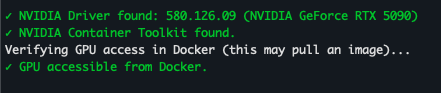
Getting started shouldn’t mean fighting with dependencies for days. We’ve created an interactive wizard that checks your OS, installs Docker, the NVIDIA Container Toolkit (if needed), and builds your chosen stack.
Open your terminal and paste the following command:
curl -fsSL https://raw.githubusercontent.com/Puget-Systems/puget-docker-app-packs/main/setup.sh -o setup.sh && bash setup.sh(Optional: If you are running on a clean install, the wizard will detect missing dependencies like Docker, Docker Compose, NVIDIA drivers, and the NVIDIA Container Toolkit, and offer to install them for you automatically.)

Step 2: Choose Your Flavor
The wizard will prompt you to select an environment “Flavor.” You can easily stack or swap these flavors as your needs change. These flavors are mapped directly to our core stages of AI deployment: Develop, Deploy, and Scale.
[Step 1] Select Application Flavor
Different flavors are optimized for different use cases:
--------------------------------------------------------
1) comfy_ui
2) docker-base
3) personal_llm
4) team_llm
Select a flavor (enter number): 1
Here is a breakdown of what to expect during the installation of each:
The “Develop” Stage Flavors
Designed for individuals or small teams building and iterating on models directly at their desk.
- The Creative Stack (
comfy_ui)
Built on the CUDA 12.6 runtime with ComfyUI Manager pre-installed, this flavor is ideal for rapid prototyping of generative AI and image synthesis. It automatically maps models and outputs to your host machine.
- The Personal LLM (
personal_llm)
Designed for deskside, single-user AI assistants. Uses Ollama as the GPU-accelerated backend for easy on-the-fly model swapping, paired with Open WebUI.
- Base LTS (
docker-base)
An Ubuntu 24.04 environment pre-loaded with Git, Python3, and Pip. Perfect for writing scripts, data preparation, code development, or pulling custom containers from the NVIDIA playground.
The “Deploy” Stage Flavor
For teams moving from local development to a centralized, shareable resource.
- The Team LLM (
team_llm)
Designed for multi-user, production inference applications. It bridges the gap between desk-side development and a full-scale data center. It leverages vLLM for multi-GPU tensor parallelism and an OpenAI-compatible API to handle massive models and serve a broader group of users.
The “Scale” Stage
For organizations implementing large-scale, mission-critical AI infrastructure.
When you are ready to move from testing to full-scale data center deployment, we highly recommend utilizing NVIDIA AI Enterprise tools. These premium solutions provide the robust management, security, and support needed for high-throughput inference and massive model training.
The Power of NVIDIA NIMs
When scaling to the enterprise level, we highly recommend looking into NVIDIA NIMs (NVIDIA Inference Microservices). NIMs provide pre-built, optimized, and secure containers for deploying AI models at scale, acting as the perfect enterprise-grade evolution of the local App Pack philosophy.
If your team is looking to scale out a generative workflow like ComfyUI across multiple nodes, or if you need custom infrastructure architecture to support your new enterprise environments, our expert consultants are here to help. Reach out to our experts and let’s build.
Step 3: Verify Your Installation & Launch
Once the wizard finishes, it will ask if you want to build and start the container in the background, as well as if you want it to auto-start on boot.
Depending on the flavor you chose, you can access the Web UI by navigating to the provided local or network address in your browser:
- ComfyUI:
http://localhost:8188 - Open WebUI (Personal/Team LLM):
http://localhost:3000
Video Overview
For the visually-inclined, here is a walkthrough showing the steps outlined above and what to expect as you follow them. There is no audio, and we sped up parts like the model downloads to avoid wasting your watch-time, but hopefully it is helpful:
Video Link: chat-stack-demo.mp4
Managing Your App Packs
Your chosen flavor will be installed in a directory (defaulting to the flavor name, e.g., ~/team_llm). Navigate to this directory to manage your stack:
- Stop containers:
docker compose down - Start containers:
docker compose up -d - Check logs:
docker compose logs -f - Reconfigure Models: Run
./init.shinside the directory at any time to pull new models or change settings.
Happy building! Let us know what you create with your new AI workstation.
Looking for an AI workstation or server?
We build computers tailor-made for your workflow.
Don’t know where to start?
We can help!
Get in touch with one of our technical consultants today.