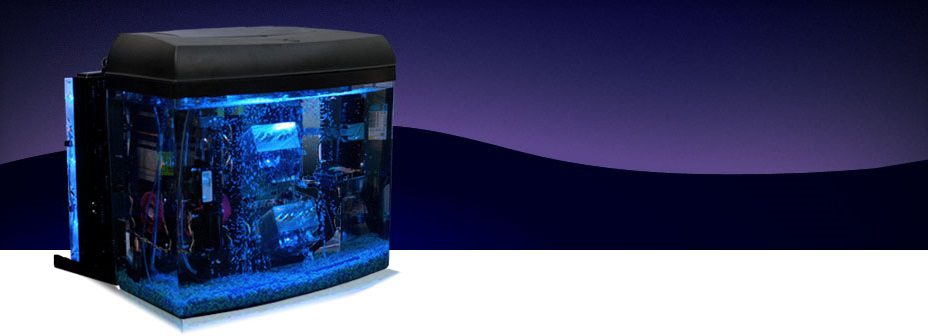
Mineral Oil Cooled PC
Why Build One?
Over the years, we have seen many custom pc projects on the web that cooled a computer using common vegetable oil, including a very popular video by Tom’s Hardware. After seeing all these projects, we had a lot of ideas of how we could do it better and more easily. Many projects used vegetable oil, which would go rancid after a short time. So we instead used clear mineral oil which is odorless and completely clear. We also wanted to use an appropriate enclosure — many other projects used a clear acrylic case, and they had to painstakingly seal each rear connector to keep the oil from leaking. We wanted to put the ports on top to solve that problem the simple way — with gravity. Other people have built systems in aquariums before, but they were always oversized and square. We wanted to use our tools and experience to custom build a solution in exactly the size we needed. This was only intended as a fun project, to see what we could accomplish, but we have freely share the results of our testing over the years, including thermal performance and long term effects.
How It Works
Standard computer components are submerged in mineral oil. The mineral oil is non-conductive, so the electronics do not short out.
Heat generated by the PC is transferred into the mineral oil at a rate over 5 times better than air.
The mineral oil is pumped through a radiator to dissipate the heat into the ambient air.
Original System
We explore the concept of mineral oil submersion, testing with a power supply, then a low end PC, then finally a high end PC.
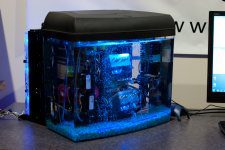
Do-It-Yourself Kit V3
After 3 years of experience, we launched of our 3rd revision to our do-it-yourself kits. This video showcases the features and improvements we made.
Frequently Asked Questions
What’s the point of this project? Crazy overclocking?
The custom mineral oil pc project has always been intended as a cool conversation piece, and a fun do-it-yourself project. While there are certainly some thermal advantages, submersion cooling is usually not the best solution for overclocking. Due to the risk of tank failure if the oil reaches temperatures above 50C, we do not recommend submerging overclocked or extremely hot hardware in this system.
Why doesn’t the mineral oil fry the electronics?
Mineral oil is not conductive. It may look like water, but it behaves very differently. Pure mineral oil does not have the free electrons necessary to conduct electricity.
What mineral oil do you use, and where do you get it?
We use a White Mineral Oil from STE Oil called “Crystal Plus 70T”. It’s odorless, clear, and very electrically resistant. You can order this oil directly from our vendor at http://store.steoil.com/mineral-oil-pc-kit/.
What about using Glycol, Motor Oil, Mono Ethylene, Mono Proyplene, Vegetable Oil, etc?
We have not tested any other oil types in our aquarium system. We recommend using only Crystal Plus 70T White Mineral Oil for this project.
Won’t the mineral oil put too much load on the fans, causing them to fail?
No, we have not experienced this. Even if they did fail, it wouldn’t matter as the fans themselves do not actually circulate the oil very much. We leave them running just because they were fun to look at, and to answer just this question! After years of operation, our fans are spinning exactly like they did at the beginning.
Won’t the mineral oil eat away at the rubber, making capacitors blow or components fall apart?
We’ve seen many variations on this question. Some people say the motherboard will fall apart, others that the acrylic tank will dissolve away to nothing! In reality, we have seen absolutely zero effect. All components are perfectly intact, and the system remains rock solid. The only impact we have seen is on rubber-based wire insulation. So as long as you make sure your wire insulation is not rubber-based you should not have any problems. If you are not sure about the insulation material, we suggest dunking part of the wire in mineral oil for a few days to see if the insulation degrades.
The only other problem is with adhesives – the label stickers on the memory came off, and the adhesive backing on the weather stripping became useless. However, it seems somewhat selective. The label stickers on the video card and motherboard are just fine. But to answer the cries of doom and gloom – we’ve seen no indications yet. All the rubber seals are intact, and the capacitors are completely unaffected. It seems as if we’ll be able to run this system for quite some time, if not indefinitely.
Won’t the air bubbles introduce water through air humidity?
Any water introduced would sink to the bottom because it is more dense than the mineral oil. This is good, because there is a gap of about a half inch before it hits any electronics. So, we should be able to see it pool there and have plenty of time to react. After many years, with the bubbles running 24 hours a day, we do not see even a trace of water. It is possible it will be hard to make out since the mineral oil is clear, but the difference in density should give us a slight “lava lamp” type appearance.
How often do you have to add more oil?
Our first setup had a problem where oil would wick down the cables, causing a very slow “leak.” We solved this issue by having no cables run directly into the oil, but rather use a connector at the top of the tank. This breaks the suction or siphon effect. Since then, we have noticed absolutely no drop in oil level.
This is fake, there is no way this would work.
We ran these setups in our Auburn, WA office for many years, but have since retired them. If you don’t believe the photos and videos above, as well videos from numerous other individuals who have tried this (either with the kits we used to sell, or on their own) then that is your choice.
Where is the hard drive and CDROM?
We didn’t submerge the hard drive, but rather hid it inside the plastic molding on top of the aquarium. There is no CDROM drive – we plugged in a USB drive when needed.
Why didn’t you submerge the hard drive?
While the oil is not conductive, it is viscous. If oil were to get inside the hard drive, that would be the end of the drive – the platters wouldn’t be able to spin at full speed, and the read heads would be restricted from free motion. Since hard drives have small holes to equalize air pressure, oil will get inside. Trust us. We tested it. However, solid state drives (SSDs) should be no problem.
Where did you get that radiator?
Our original radiator is imported from Germany, and is no longer available.
Dood! Put fishez in ur tank!!!1
No. They would die.
OK. No fish, but how about C:\HORSES ?
lol
Timeline
Original System Launch
May 2007
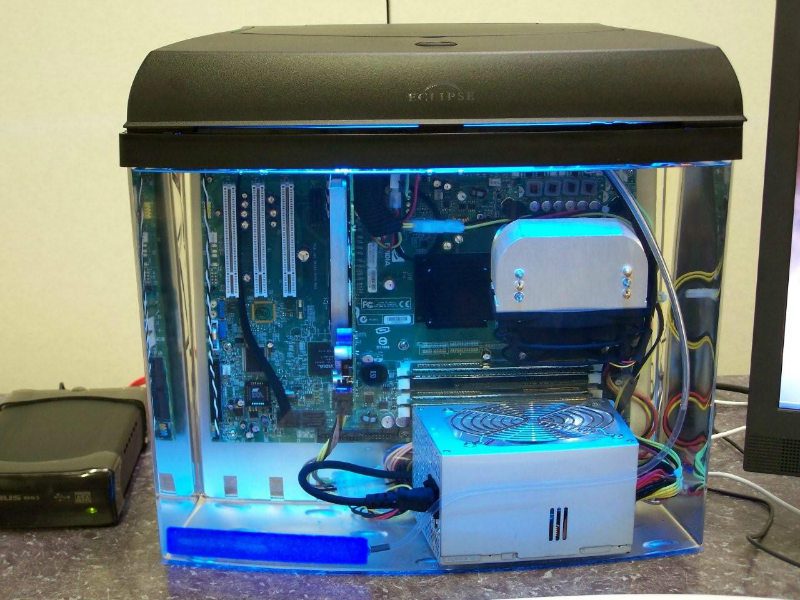
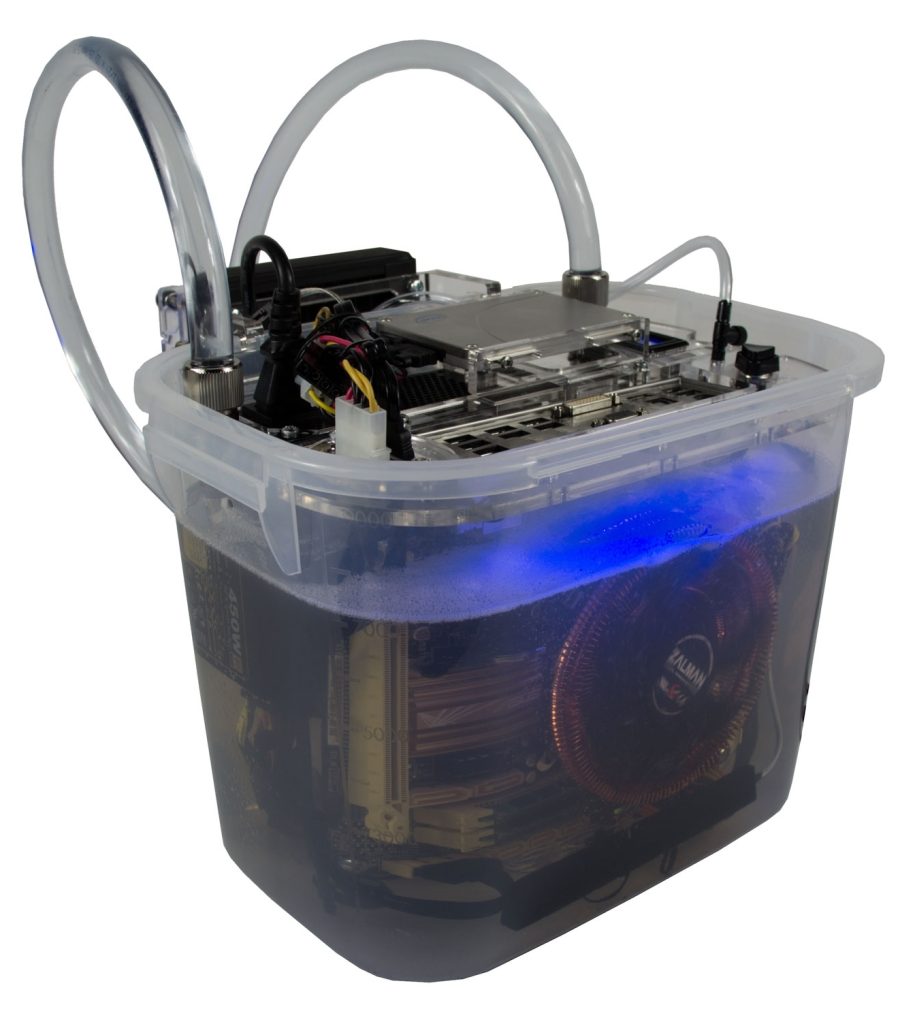
Eclipse System 6 Aquarium, Lian-Li Motherboard Tray, and 5-6 Gallons Mineral Oil
Using the primary components above, we hacked together our first system. The setup is quite simple – we made a few cuts to the top brackets on the aquarium, and cut a sheet of acrylic panel to provide a flat base for the motherboard tray to rest on. We later found we needed a better solution for the power supply – it is a bit clunky just sitting at the bottom of the tank. It made maintenance difficult because the motherboard tray could not be easily lifted from the tank without dragging the power supply along with it. We didn’t intend to run the system with fans, but once we saw them spinning slowly in the oil, we just couldn’t resist keeping them! With the oil, they made no noise at all.
Speaking of oil, you’d be amazed how difficult it is to find quantities of mineral oil locally. We learned that it is given as a laxative to horses, so you can talk to a local vet to get it, though you get some funny looks.
We started with the cheapest hardware possible, just in case the whole thing blew up! When the first test went perfectly, we moved up to modern hardware.
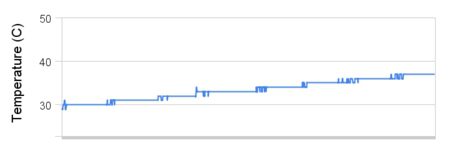
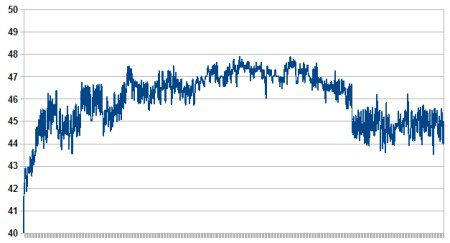
One of the best things about this setup is that the oil evenly distributes the heat. You don’t have nearly as localized hot zones as you do in an air cooled computer. The mineral oil has considerable specific heat capacity, which means it can absorb lots of heat. Because of this, it takes the system quite a while to work up to its equilibrium temperature. Starting at an ambient 29C on the CPU, we found it took about an hour to hit a stable idle CPU temperature of 37C.
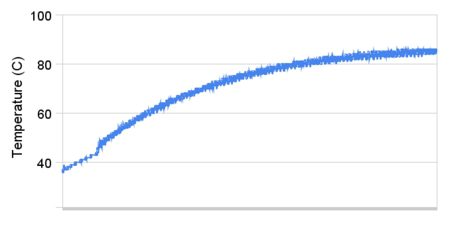
The system under load was a different story. We put the system under full CPU and GPU load, and watched the temperatures climb. It took a really long time. After 12 hours, the system topped out with a CPU temperature of 88C. Yes, that is really hot. The system was rock solid and didn’t crash when running stress tests for 48 hours at these temperatures, but we do not recommend running anything close to this hot, as the acrylic can easily crack at that temperature. We later added a radiator to solve this problem.
Another question we wanted to answer was how quickly the system cooled once we stopped the stress testing. It takes a while for the oil to dissipate heat through the tank, especially while the PC was still running, but it dropped back to an idle baseline in about 8 hours.
Did Bubbles Help?
After we saw the high maximum temperatures, we started to think about what would happen if we pumped bubbles into the system. Theoretically, since the bubbles composed of cooler outside air, they should pick up the heat, rise and release it to the air above. Did it help? After about 2 hours, the temperature settled at a new maximum of 84C on the CPU under load. The bubbles did have an effect, but not as much as we were hoping for. Interestingly, the bubbles also hurt the video card temperature, causing it to rise by a few degrees! It seems the bubbles also served to agitate all the contents of the aquarium, bringing everything to a more consistent temperature throughout. For this reason, we do recommend bubbles.
Improving Cooling Performance
July 2007
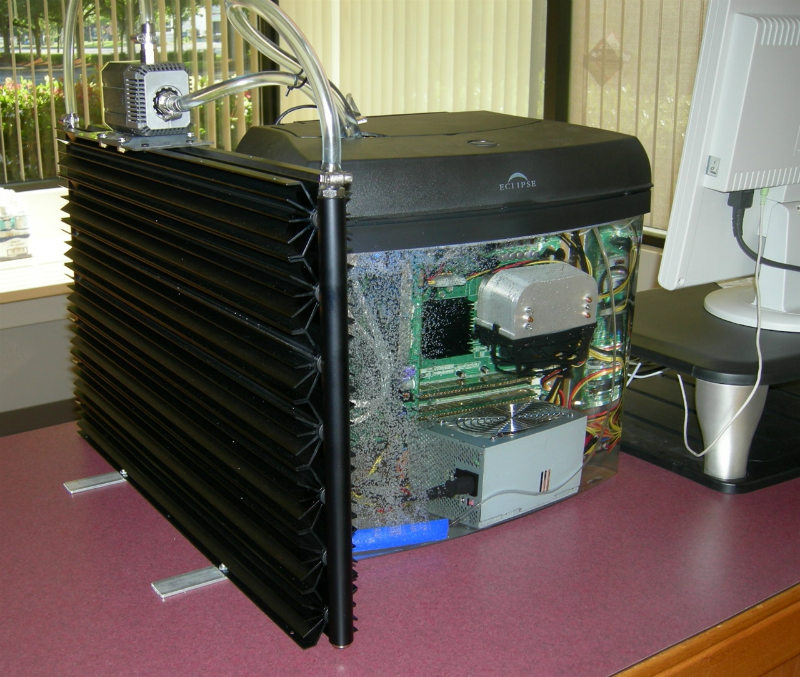
The biggest issue with our initial V1 system was inadequate heat dissipation. Mineral oil has a terrific specific heat capacity, so it took a very long time to reach peak temperature – about 12 hours. However, that temperature was too high, at 88C on the CPU. On the one hand, we had absolutely no problems with stability with over a month of usage at those temperatures. The oil did a good job of making sure everything was a very consistent temperature. With a normal air cooled computer, you have a handful of hot spots. With the oil eliminating these hot spots, we had no problem running a rock solid system. On the other hand, 88C is way too hot for acrylic. What could be worse than the tank cracking and spilling the hot oil!? We wanted better temperatures. We’ve received dozens of different recommendations on how to best cool the oil, some extremely complicated. We elected to simply pump the oil directly through the radiator. We did a lot of liquid cooling here at Puget, so we had a lot of materials on hand.
The results were very good! Within 8 hours, the temperature dropped to a new maximum of 45C on the CPU. If we wanted to get even better cooling, we could have hooked up some fans to the radiator, but 45C is an excellent CPU temperature as it is, and we preferred the quiet operation with no fans.
Update After Six Months
Dec 2007
The machine is still up and running with no problems! We made a few more alterations:
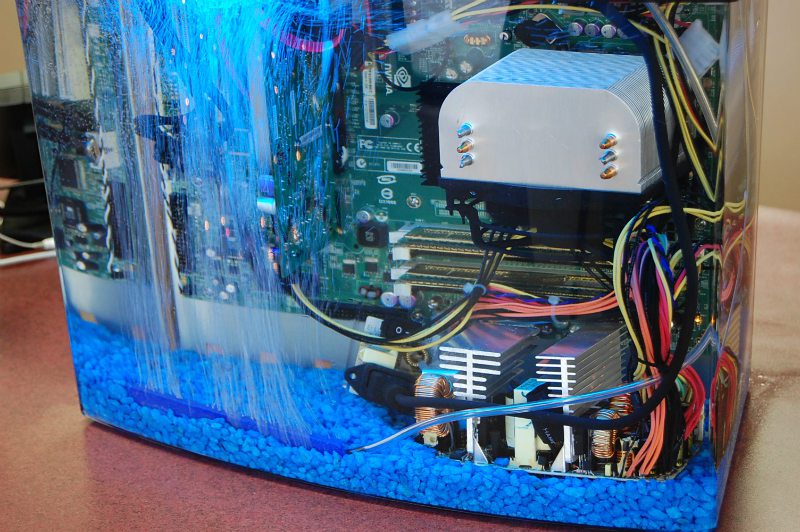
- We took the power supply out of its housing. This makes it much smaller, and less in the way. This is a great improvement to the look of the machine. This does remove the fan from the power supply, but it was already clear that the fans were not necessary. There is a real risk of shock if you don’t handle it properly, so we DO NOT recommend doing this yourself, but without the housing, the power supply looks much more at home in a system like this.
- We added blue crushed rocks to the bottom. It adds a finished look to the system, and gives it even more of an aquarium theme. We checked carefully to make sure the rocks were not conductive, since they come into direct contact with the power supply.
The fans are still running strong, just like they did on day one. Two times now, we have seen some oil on the countertop, and panicked thinking we had a leak, but each time ended up being a false alarm. It seems some days the bubbles tend to “foam” the top of the mineral oil, and this foam was spilling out of the aquarium. We just turned down the bubbles a bit, and everything was fine. It is curious that this only happens on certain days. Perhaps humidity plays a part?
Update After One Year
June 2008
The machine is still running strong! We are having no problems with stability, and it has now been running for over a year, most of the time at 80C (still not recommended…the acrylic could crack)! It is very easy to lower the temperature through a radiator, or just putting the system into standby at night, but we wanted to see if stability would be affected by higher temperature.
The fans continue to run strong. We’re amazed by the number of people that continue to be concerned that the fans will burn out. It is now very clear that the fans have absolutely no problem running in this environment.
There is no sign of weakening of rubber seals or PCB. We have found that prolonged exposure to mineral oil does not eat away at any components. However, you will notice in the pictures that the voltage module for the LED light has fallen down. That module was stuck in place with nothing more than a sticker — it took 9 months for it to come down! We’re amazed it stayed up that long, but definitely recommend you do not rely on stickers or tape to fasten anything. Zip ties will be more solid and long lasting.
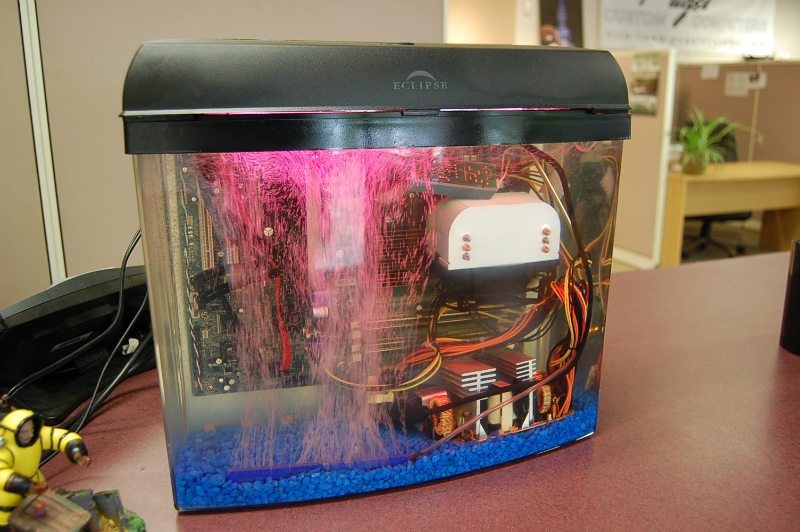
The CCFL light has turned from blue to purple. We aren’t sure whether that is due to the oil, because we’ve seen it happen with other CCFL lights in regular computers.
The oil has gotten slightly murky. It isn’t a very large change, but it is definitely there. This oil has been sitting, unfiltered, for a year, so it isn’t really surprising! A quick pass through an oil filter (maybe even a coffee filter!) or a change of oil once a year is all that would be needed to counter this problem.
Overall, the biggest downside we have found is that the oil wicks down the cabling and makes a mess. Its amusing at first to find oil seeping out of your mouse, but gets annoying very quickly! We recommend making extensive use of wireless (especially bluetooth) for a system like this. There’s no reason why you can’t run only a power cord and video cables to the box, and take care of everything else wirelessly. We completely solve this issue later with our V2 system under development. Every day, we’re coming up with improvements we’d like to make to the machine.
Update After Three Years
July 2010
Though the PC was still running strong, the hardware was getting older, and we wanted to upgrade to something faster! At our office, we upgraded to our V2 system! Still in fully working condition, this original system has been retired to storage, and we’ll pull it out from time to time to see if there are any ill effect over long term oil submersion.
V2 DIY Kit Launch
Oct 2008
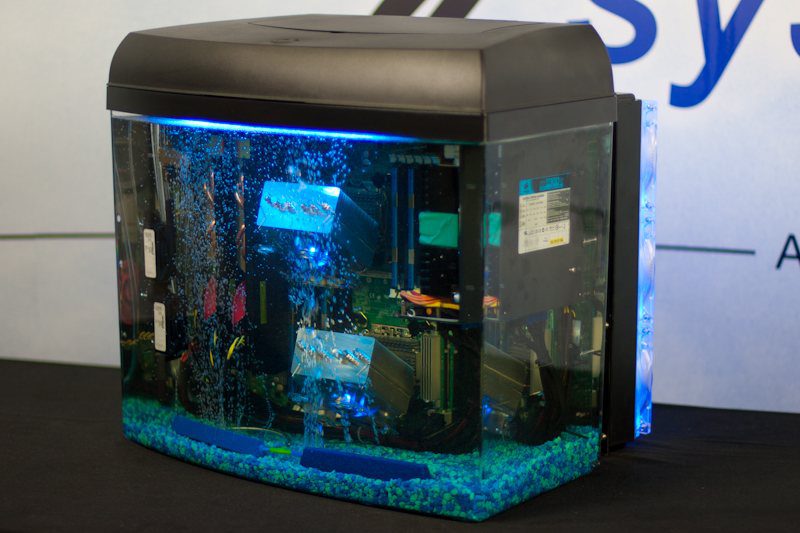
While our original aquarium computer was still running strong, there were number of updates we wanted to make to the design. We decided to build a “Version Two” system, with these improvements. The biggest design improvement is that we have designed an acrylic motherboard tray, which is completely customized for this application, in this aquarium tank. Not only does this take the polish of the project to an entirely new level, but it makes assembly easier and the system much more secure. The other major design improvement came in the cooling system. We wanted to create a radiator system that was more compact, and that placed the pump submerged in the oil, for quieter operation. We built this system for demonstration at PAX 2008, and it was a complete success! It has allowed us to run an extremely high end system at under 50C with virtually no noise. It has also allowed an overclock of a QX9770 from a stock frequency of 3.2GHz, to an overclocked frequency of 4.6GHz!
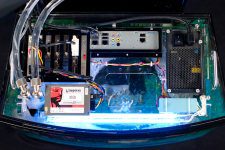
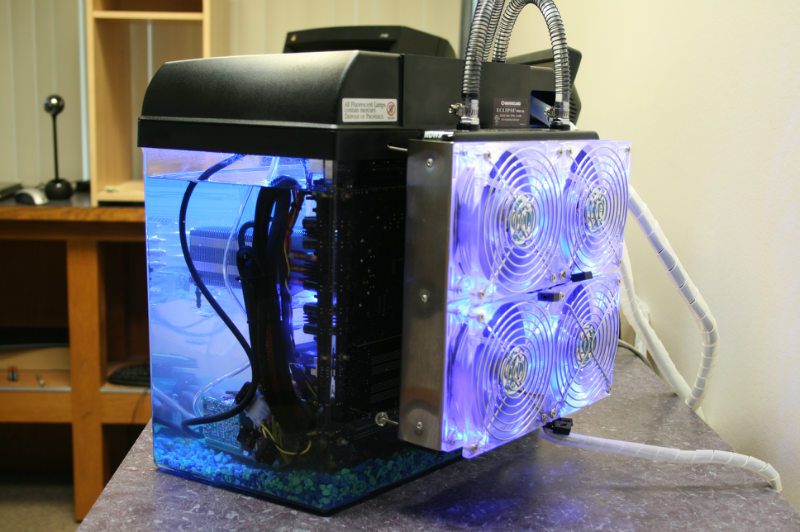
The view of the top with the cover off shows how much the custom acrylic motherboard tray improves the project. We were able to design mounting holes for CCFL lights, which allows us to permanently zip tie them in place rather than have to rely on adhesives. The tubing to the radiator uses quick disconnect valves, so you can quickly add and remove the radiator depending on your cooling needs. We mounted four Antec Tri-Cool fans to the radiator, and ran them on the low setting, for very quiet operation. The loudest part of this system is the bubble bar!
The custom motherboard tray also allows us to install a power socket, and a control valve for the air hose. These connection points serve a distinct purpose! By not running any cables directly into the oil, we prevent wicking. The connection points break the suction, and has effectively stopped the wicking we saw with version one. A power cord extension is run down to the power supply at the bottom of the tank, and in this system, we directly soldered the cord to the power supply, to eliminate the bulky socket. In this system, the pump and hard drive (solid state) are both submerged. Using a special bracket, we are able to secure them both in the oil. We also used a larger heatsink, but performance was about the same.
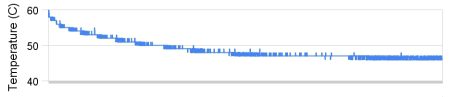
How well does this setup cool? AMAZINGLY well! In this system, we put in the best hardware available at the time – an Intel QX9770 overclocked to 4.6GHz, 8GB of DDR3-1600 memory, and a NVIDIA GTX280 video card. It ran at 50C under full load, and that was with our fans on the low setting! This graph shows the CPU temperatures we saw as we ran 3DMark Vantage, then let the system idle. You’ll notice the temperature barely changes at all – the radiator handles the heat with ease!
Two Years Later, Still Running Strong!
June 2010
We continue to run our V2 system as a workstation for one of our employees, and it is still running strong with no problems. The oil has remained quite clear, there have been no leaks, and the cooling system is running as strong as on day one!
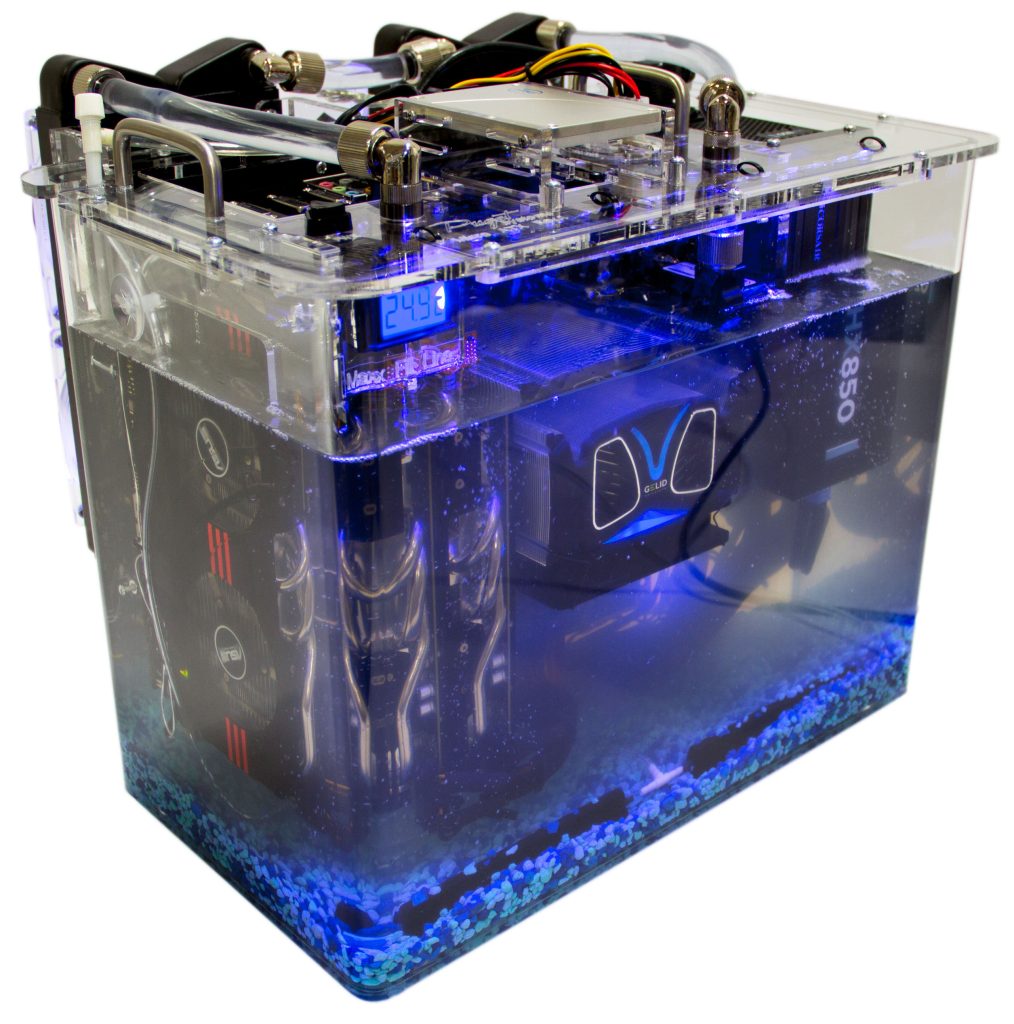
V3 DIY Kit Launch
July 2010
As we continued to learn from our original Aquarium PC, and as we used our Aquarium PC V2 in our office, we kept a list of all the things we’d do differently or improve. The Aquarium PC V3 represents these improvements! The system is larger, allowing for full eATX motherboards. The biggest improvement is that it allows the power supply to be mounted on the motherboard tray, making it much easier to maintain the PC, as you don’t have to worry about the power supply sitting on the bottom of the tank as you pull the motherboard tray out of the aquarium. It also has more than twice the cooling power! We built a test system with the most extreme hardware available, with impressive results.
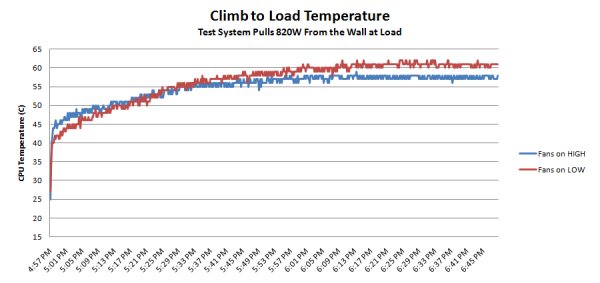
Under full load with Prime 95 (16 threads) and FurMark (multi-GPU mode), our test system pulls a staggering 820W from the wall! That is a lot of heat to dissipate. We used Antec tri-cool fans on the radiator, and we tested the system with the fans on low speed (very quiet), and on high speed (no so quiet). Even with the fans on low, the system maxes out at just over 60C. When pulling 820W of power, that’s a very impressive number! It took the system about an hour to reach maximum temperature.
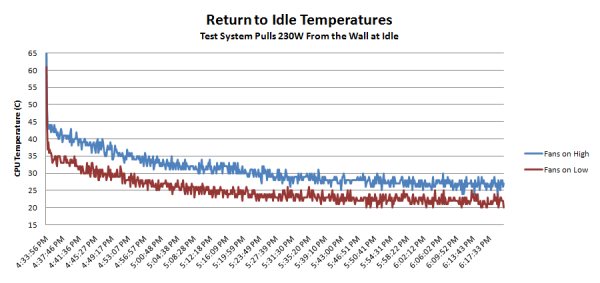
At idle, you see the submersion cooling shine even more. Even though the extreme test system is still pulling 230W from the wall (which is high for a PC), the cooling system easily handles the load, reaching a CPU temperature of around 27C with fans on low speed. This is only a few degrees over ambient, and can be confirmed by placing hands on the tank: it is only mildly warm to the touch! Again, the system takes about an hour to reach its bottom temperature once we cut off the load.
Design Improvements
Larger, Sturdy Frame: Mineral oil submersion is very effective at cooling extreme PCs, but extreme PCs take up a lot of space! The new V3 kit is larger, allowing for more room to work, and more room to fit high end components. Walls down the side of the motherboard tray allow for mounting of more components, and also add a great deal of rigidity to the tray. This is important because as you lift the tray out of the aquarium, you don’t not want it to flex and loosen your components!
Ease of maintenance: First, the V3 Kit mounts the power supply on the motherboard tray, which is a huge improvement over the lack of a power supply mount on the V2 Kit! It makes the entire PC into a single unit, so if you pull it out of the tank, you don’t have to worry about cables or wires — everything moves together. Second, with the larger tray, we are able to create a larger access port. Our goal was to make the port large enough for most people’s hands to fit through. This makes it much easier to reach into the tank and make fast adjustments. Third, we have added lift handles to the top of the motherboard tray, making it much easier to lift up and out of the tank.
Cable routing: Mounting the power supply on the motherboard tray means that you gain much more control over your cable routing. We provide holes throughout the tray (especially along the side walls, and across the bottom) to allow you to firmly zip-tie your cabling in place. It looks great!
Fits full eATX Motherboards: You can fit up to an EATX sized motherboard onto the tray, allowing you to use extreme dual processor motherboards! If you use a mATX or ATX motherboard, you expose additional cable routing points along the motherboard tray, and allow for mounting of additional lighting.
Fits multiple full size video cards: We make sure that the video card area is completely clear of obstructions. You have room to mount even the longest length video cards, and you can fit up to three video cards into the system with no modding required!
Mounts extended length power supply: Anticipating high end configurations, we wanted to make sure that you have room to fit even the most extreme power supplies. We have kept the area below the power supply clear, allowing you to mount very high end, long length power supplies.
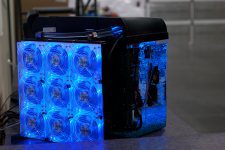
Enormous cooling capacity: The V3 kit uses a larger radiator, with a 3×3 grid of 120mm fans. With 9 fans, you can run them all on low speeds, allowing for both quiet operation and extreme cooling!
Dual pumps: We use 1/2 inch tubing and need dual pumps to provide the flow rate necessary to make good use of all the surface area provided with the larger radiator. This not only improves performance, but adds redundancy. It also gives the system enough power to pump the fluid through the radiator with no priming necessary, making the system much easier to set up.
Hard drive mounts: The larger size of the tray gives us room to provide mounting points for both a 2.5 inch hard drive (such as a SSD) and a full size 3.5 inch hard drive. We provide spacers to lift the hard drives off the tray by a small amount, allowing airflow around the hard drives, keeping them cooler.
Phase Change Cooling Development
Aug 2010
While we were very happy with the cooling performance of this unit, we actively researched methods to try to bring the oil to sub-zero temperatures! We tried a number of different extreme cooling techniques, including dry ice, phase change cooling, aquarium chillers, and liquid cooling blocks with TEC coolers. Ultimately, the snag was always the same: The thermal conductivity of oil is not as good as that of water, so all products designed to cool water do not have the sheer surface area necessary to cool the oil. It is possible that you can build your own aquarium chiller, taking care to dedicate a large amount of extra copper coils to the oil side of the heat exchanger. However, we have spent a lot of time on this, and have to get back to our main jobs — building high quality computer systems! We encourage those with experience in phase change cooler design to pick up this ball and run with it, and if anyone can achieve a sub-zero cooling technique, we’d love to talk about it and post it here. Our standard radiator setup does a great job of cooling, so we’re happy leaving our project there…but sub-zero would be pretty amazing!
V4 DIY Kit Launch
Oct 2011
We continue to make design improvements, rolled into our latest V4 release. We have now purchased our own laser cutting machine, which allows us to bring manufacturing in house. This will speed up future design improvements, and will improve the overall quality of the product. With V4, we move back to a single pump design, which is much simpler, and therefore more reliable and quite a bit less expensive! For more details and to purchase a V4 DIY kit, check out our ordering page with this information.
Micro ATX and Mini ITX DIY Kits Launched
Sept 2013
We’ve often heard how much someone wants to build an aquarium PC, but the cost of the EATX V4 kit is simply outside their budget. In order to provide more affordable aquarium kit options, we have developed two new DIY kits. The Micro ATX kit is a bit smaller than the current EATX V4 kit, but by utilizing multiple different cooling options has the exact same cooling potential as the EATX V4 kit. But if you do not need a massive 9x120mm radiator, you can greatly reduce the cost of the kit by purchasing more other, more modest, cooling options.
The Mini ITX kit, however, takes a completely different approach. Instead of offering multiple cooling options, we simply designed it to be as low cost as possible. While this does come with some drawbacks (for example, no PCI cards can be used), this is a great kit for those than want an aquarium PC at a very modest price.
Sales Discontinued
Nov 2014
Unfortunately our mineral oil aquarium PC kit project has been alleged to infringe on the patents held by a company who holds several patents related to mineral oil cooling of PCs. They offered to license this technology back to us. We decided to shut down this project instead, because the licensing cost was infeasible for this type of project, and we did not want to set a precedent of paying to license something we conceived and developed on our own.
Here at Puget Systems, this project was never motivated by profits. It was a project that we had a lot of fun with, and that we enjoyed using to enable the enthusiast community to do new and interesting things. As such, regardless of how we felt about the validity of this patent pressure, we could not devote the time, finances and energy to take up that battle. We have a very successful business manufacturing high performance and high quality PCs and workstations, and will be focusing our energy there going forward. We will continue to host information, photography, and videos about our mineral oil PC kits, but we will be unable to continue to sell the kits themselves. We look forward to seeing what you all come up with as we pass off the torch to each of you!
DIY Assembly Tips
- WARNING: Submerging your hardware in mineral oil will void your warranty. Do this project only at your own risk. Puget Systems is not liable for any hardware problems, or damage to your personal property. Mineral oil is very difficult, in fact nearly impossible, to clean from your components once they are submerged.
- Do NOT power on the pump until it is filled with oil: The pump will burn out if there is no liquid to provide resistance and cooling. If you need to test the system once installed, but before filled, simply unplug the pump before powering the system on.
- Test your hardware before submerging: The last thing you want is to find out you have a bad stick of memory once it is already covered in oil! Make sure to test everything thoroughly — it will save you a lot of headache in the future.
- Prime the radiator before powering on: Pumps may not have enough force to pump the oil up and over the tubing loops leading to the radiator. To prime the radiator with oil, start by filling the tank with oil until the pump is fully submerged. Next, disconnect the outlet tube. Push open the close-off valve with your finger, and prop it open with a small item like a toothpick. Use suction to pull oil through the radiator until you see it in the outlet tube. Quickly remove the toothpick to close the value, then reconnect the tube to the aquarium. The radiator is now primed, and your pump should have no problem circulating the oil! With a sufficiently powerful pump, however, this step is unnecessary.
- Hard Drive: We recommend the use of a solid state drive, because you can submerge it in the oil. WARNING: Do not submerge a standard hard drive! The oil will slow the platters and read heads, and will break the drive. If you would like to use a standard hard drive, set it on top of the unit and make sure it is elevated well out of reach of the oil.
- Keyboard/Mouse: Due to the mess of working with mineral oil, we recommend keeping everything wireless if possible!
- Power Supply: Some people have tried removing the metal casing around power supplies when submerging them in oil, but we STRONGLY RECOMMEND AGAINST DOING SO. A live power supply is extremely dangerous. Even when not plugged in, a power supply can store incredible amounts of power in its capacitors and can be deadly.
- CPU Cooler: The best CPU cooler options for use in oil will have fins aligned vertically when the system is complete. This will allow convection to effectively circulate the oil through the cooler. The fan is not needed, but we have always elected to keep it installed to help circulate the oil. The fan should not burn out due to being in the oil.