Table of Contents
Introduction
Alongside many software developers, Adobe has been hard at work introducing a range of AI-powered tools inside its applications. Although many of these features rely on cloud processing, an increasing number can run directly on your local hardware. In Premiere, this includes Auto Reframe, Transcription, and Scene Edit Detection, while Photoshop offers tools such as Select Subject and the more recent on-device Remove Tool. The performance of these features varies significantly, ranging from operations that finish in a fraction of a second to those that require substantial processing time.
Today, we want to take a close look at the Remove Tool in Photoshop – specifically, its ability to run Generative AI processing directly on your system. For professionals working with sensitive images, keeping processing local can be desirable and is sometimes a hard requirement. Running on-device also means you never have to worry about credits and, depending on your system’s performance, can be faster than running on the cloud.
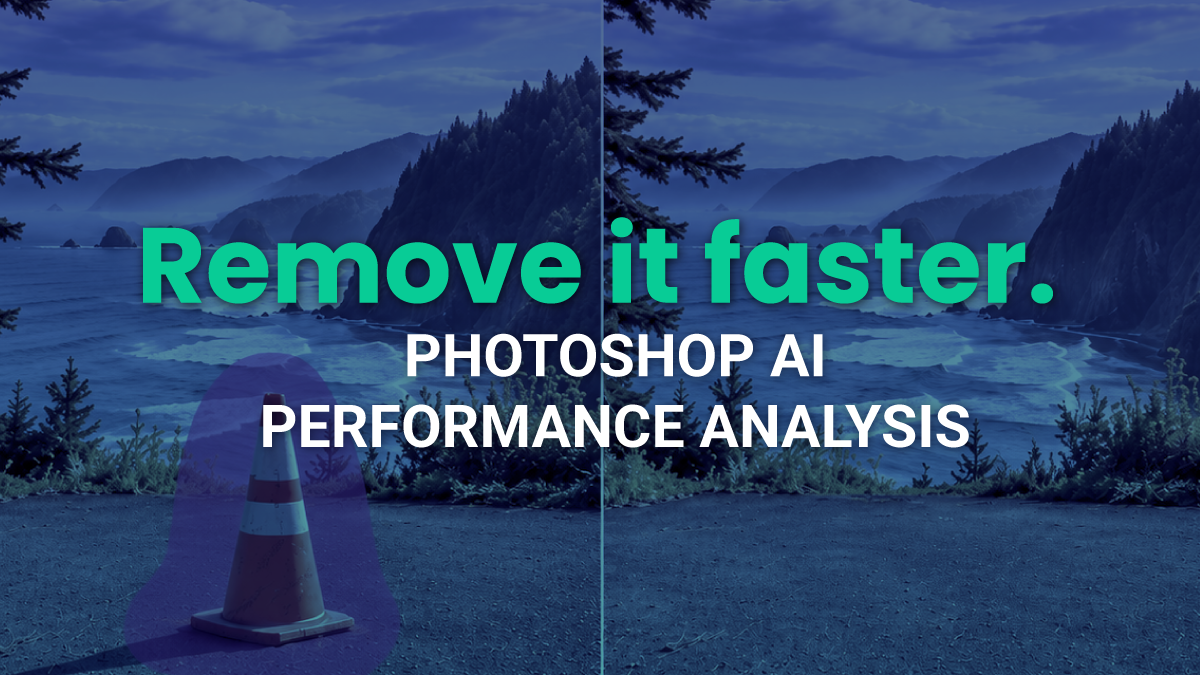
One thing to be aware of is that running on-device AI models can be extremely resource-intensive, and the Photoshop Remove Tool is no exception. Depending on your GPU brand, you need at least 12 GB (Intel), 14 GB (NVIDIA), or 23 GB (AMD) of VRAM to run the feature, while systems using integrated graphics may require as much as 64 GB of system memory. That is a significant hardware requirement for what might seem like a relatively simple editing task. If you’re interested in using the on-device Remove Tool, we recommend checking Adobe’s documentation to see whether your system can run it.
Testing Methodology
To test the Remove Tool in Photoshop, we created a custom version of our Puget Bench for Photoshop benchmark. If you want to replicate this testing on your own machine, we have downloads and a step-by-step guide below. There are a number of manual setup steps necessary before running the benchmark, all of which are required, so be sure to follow the guide exactly.
There are two benchmark versions: 99.0.0-dev.1 tests in on-device mode, while 99.0.0-dev.2 tests in cloud mode. Note that cloud mode may not be consistent and could give different results based on a range of factors. If you get very slow results (40+ seconds) when testing on-device, your GPU is likely not supported and Photoshop is silently falling back to processing on the CPU instead of the GPU.
Benchmark Step-By-Step Guide (Expandable)
Install Photoshop Beta
- Open Adobe Creative Cloud and log in.
- Go to Apps → Beta.
- Find Photoshop Beta and click Install.
- Once installed, click the three-dot context menu next to Photoshop Beta.
- Select Get Add-ons.
- Install “Remove Tool advanced components”.
- Click Done.
Configure Photoshop
- Open Photoshop Beta.
- Click New File and create a blank document.
- Select the Remove Tool (under the Band-Aid/Healing tools on the left toolbar).
- Enable “Remove area after a single stroke” in the top options bar.
- Close Photoshop.
Install the Custom Puget Bench Benchmark
- If you do not yet have it installed, download and install Puget Bench for Creators.
- Download the custom benchmark ZIP file.
- Unzip the .json files to the following location:
- Windows: C:\Users\[USERNAME]\AppData\Local\com.puget.benchmark\benchmarks
- MacOS: ~/Library/Application Support/com.puget.benchmark/benchmarks
Run the Benchmark
- Open Puget Bench for Creators.
- Go to the Photoshop tab.
- Change the benchmark version to 99.0.0-dev.1 (or 99.0.0-dev.2 if you want to test in cloud mode).
- Make sure Photoshop Beta is selected as the application version.
- Click the “Download Assets” button, then “Start Test”.
If you run into issues, double-check that all the above steps were completed. You may also want to manually use the Remove Tool in “On Device” mode to ensure that your GPU is supported.
The hardware we decided to look at spans a wide range, including high-end desktop GPUs as well as mobile workstations. We aren’t trying to drive into too much detail right now; we’re more interested in getting a general sense of the Remove Tool’s performance characteristics.
Hardware Test Setup (Expandable)
dGPU Test Platform
| AMD Ryzen™ 7 9850X3D |
| RAM: 2x DDR5-5600 32GB (64 GB total) |
| PSU: EVGA SuperNOVA 1200W P2 |
| Storage: Kingston KC3000 2TB |
| OS: Windows 11 Pro 64-bit (26200) |
PC Mobile Workstations
| Puget Mobile 17″ Intel Core Ultra™ 9 275HX NVIDIA GeForce RTX™ 5090 Mobile |
| HP ZBook Ultra G3a AMD Ryzen™ AI Max+ PRO 495 AMD Radeon™ 8065S Graphics |
| Microsoft Surface Laptop Ultra NVIDIA RTX™ Spark N1X CPU (20-core) NVIDIA RTX™ Spark N1X GPU (6144-core) |
Apple Mobile Workstations
| Apple MacBook Pro™ M5 Max Apple M5 Max CPU (18-core) Apple M5 Max GPU (40-core) |
| Apple MacBook Pro™ M3 Max Apple M3 Max CPU (16-core) Apple M3 Max GPU (40-core) |
Benchmark Software
On-Device Remove Tool Performance
System Image
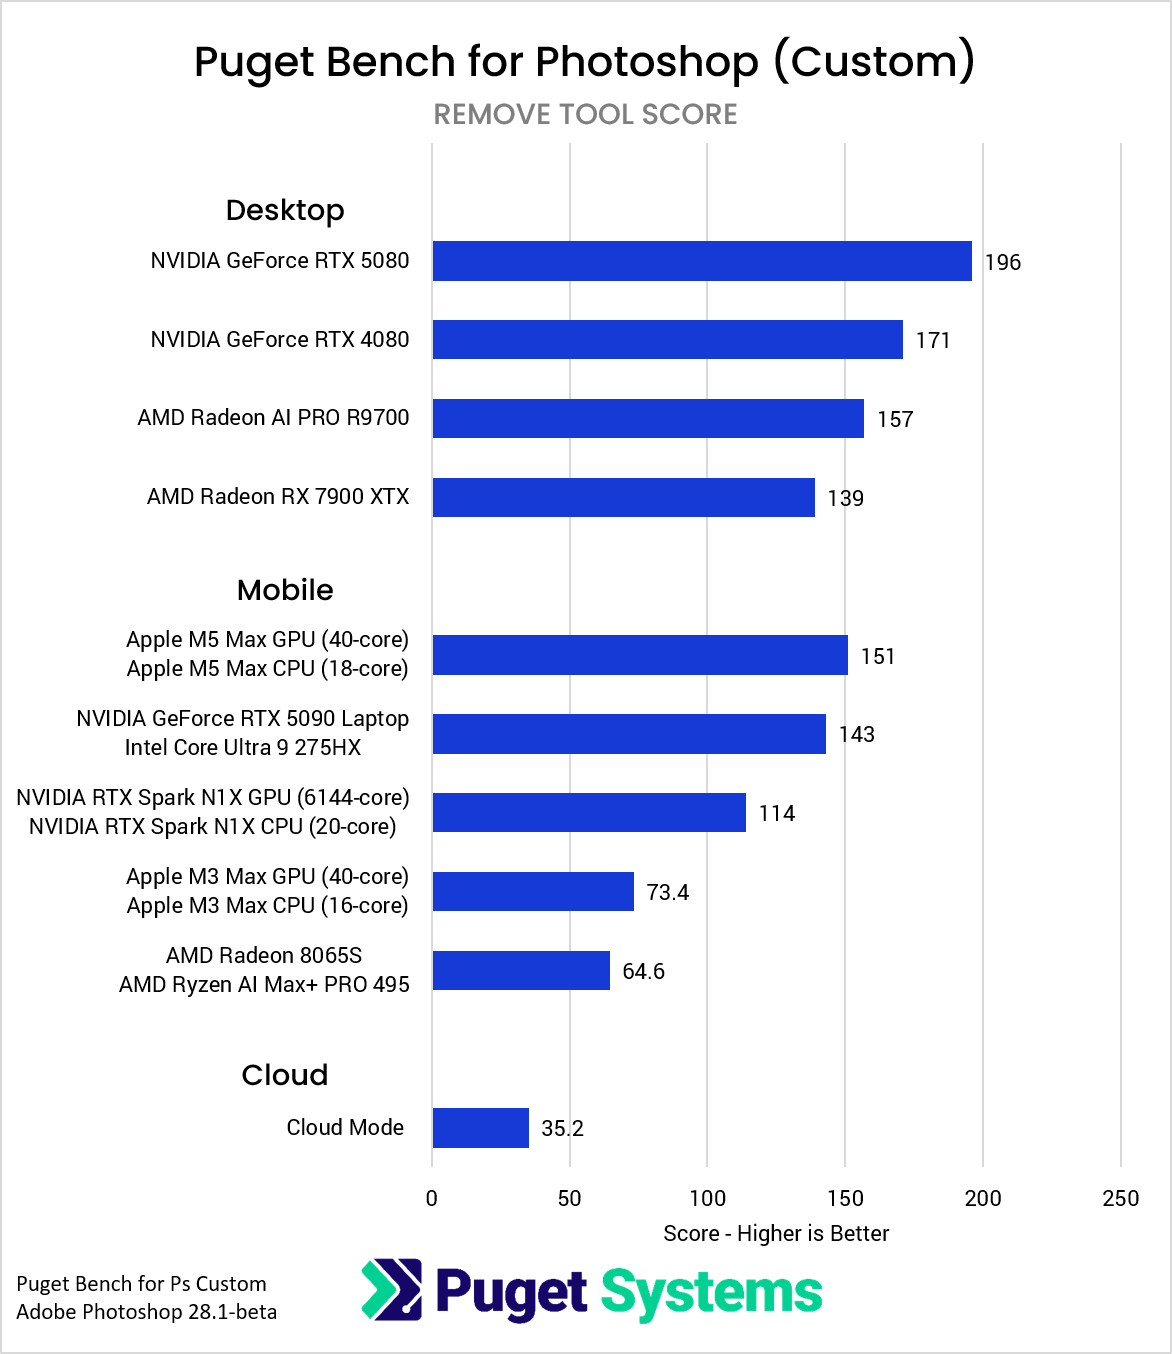
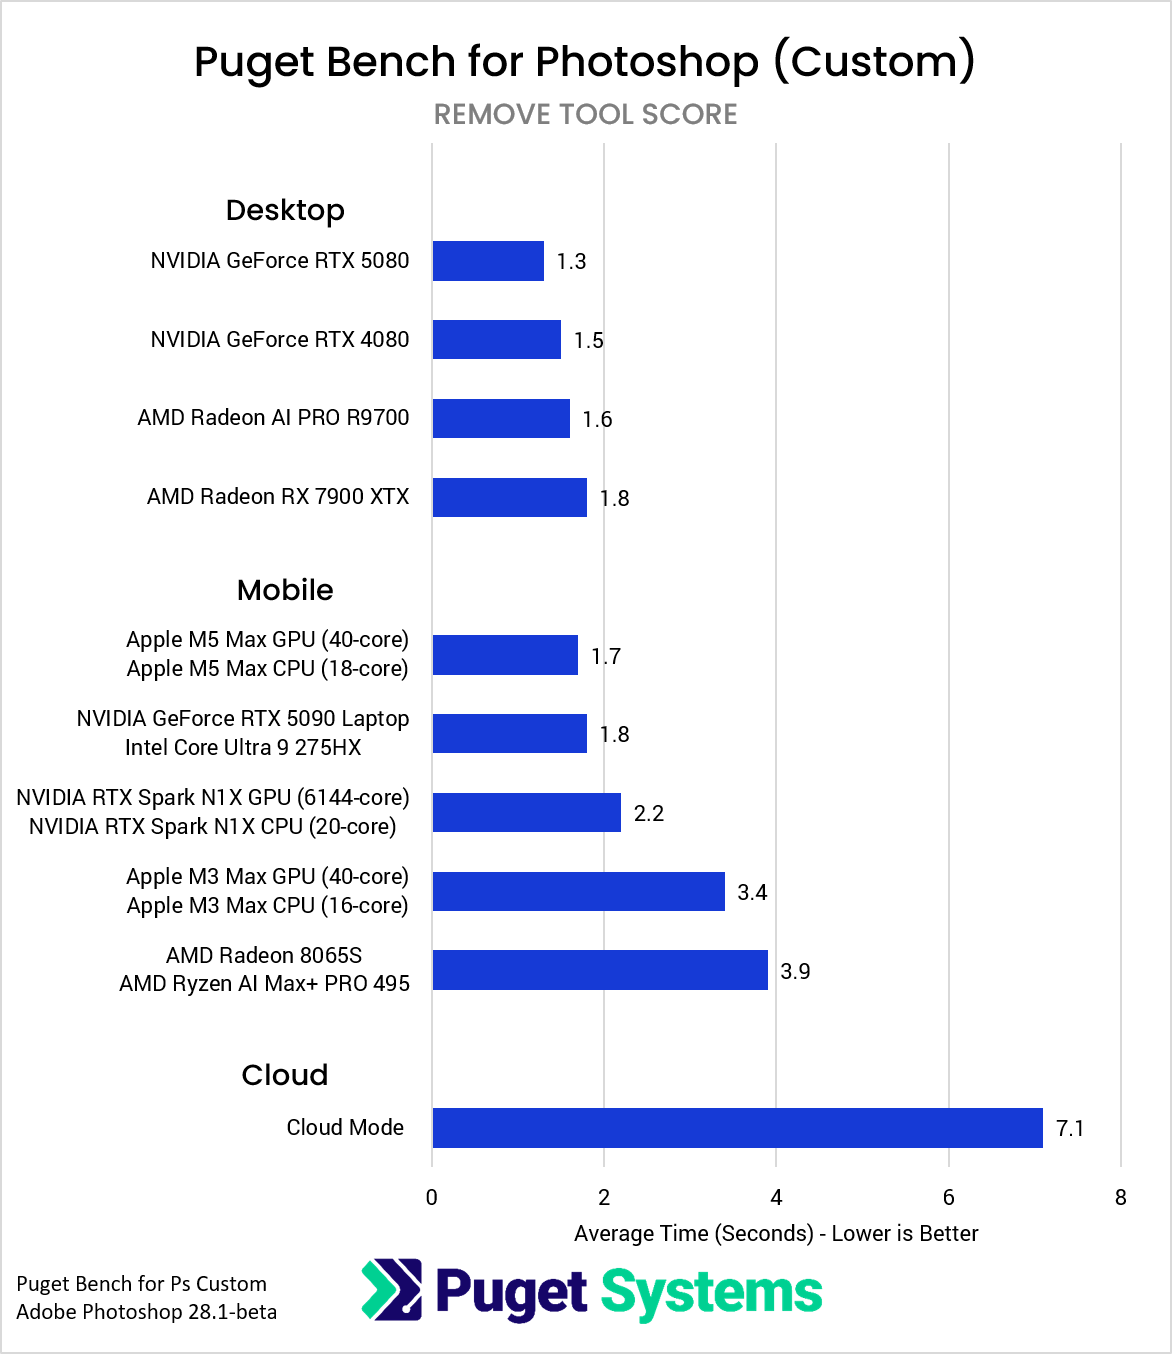
The first chart above is a calculated score based on the results from eight separate Remove Tool tests. The exact formula is 250*(1/geomean(results)). Alternatively, the second chart shows the average time across all of the tests. Note that there can be variation in how long it takes for the Remove Tool to complete, depending on the specific image and brush stroke, but the average times tell the same story as the calculated scores.
The first thing we want to call out is how much faster on-device is compared to the cloud. Cloud performance will depend on additional factors like your internet speed and Adobe’s server load, but in our case, running on-device was 1.8x to 5.5x faster! For a tool like this, where you might perform dozens of removes while cleaning up an image, being able to go from around 7 seconds to as little as 1.3 seconds per operation can be a massive boost to your productivity.
Between the desktop GPUs we tested, the most interesting thing was how little generational difference there was. For example, an NVIDIA GeForce RTX 5080 was only 15% faster than an RTX 4080, and an AMD Radeon AI PRO R9700 was 14% faster than an RX 7900 XTX.
For the mobile workstations, we had a much wider range of hardware to test, covering Apple, AMD, and two NVIDIA flavors (GeForce RTX and RTX Spark). It is interesting to see how close the RTX 5090 laptop GPU performed compared to the RTX 5080 desktop, especially since the laptop version of the 5090 is more closely equivalent to the desktop RTX 5070 Ti.
We do want to add a massive caveat that the quality of on-device vs. cloud is something that should be taken into consideration. We did some testing on that topic, and while the outputs of the two modes differed significantly, it was hard for us to say which was objectively better. Quality aside, our testing clearly shows that if you have a system that meets the fairly high requirements to run the Remove Tool on-device and are looking to speed things up, running on-device is definitely something you should experiment with!
Conclusion
The ability to run AI tools on-device is something we almost always encourage and advocate for. There are major advantages from a data security standpoint, and depending on the tool, there are often cost and performance benefits as well. For the Remove Tool, Adobe is not currently charging credits to run the Generative AI in the cloud, but the performance gains from running on-device can be pretty stark if you use it regularly.
This article is just a first look at how this tool performs on-device, and we hope to follow up with more in-depth testing in the future. The number of GPUs it can run on is fairly limited at the moment, but as Photoshop gains more AI-based features, we expect this type of testing to become increasingly important. There are already several other aspects of the Remove Tool (Find Distractions, Find People, and Wires and Cables Removal) that we are interested in testing, but they currently lack scripting support. We are hopeful that support will be available in upcoming versions of Photoshop, and are looking forward to expanding on this testing in the future!
If you want to see how your current system performs to determine whether a GPU upgrade is worth the cost, the custom Puget Bench version we used, along with a full how-to guide, is in the Testing Methodology section above.

Looking for a Photoshop workstation?
We build computers tailor-made for your workflow.

Don’t know where to start?
We can help!
Get in touch with our technical consultants today.