The Good News
Up until recently, it had been a bit of a pain to get the right Nvidia drivers installed in Ubuntu. Typically you would need to add a PPA and install the driver through the use of the terminal, or install it manually from a .run file. That is no longer the case. The latest Nvidia drivers will be available to Ubuntu LTS releases through an SRU (Stable Release Update) without the need for a PPA. Other Linux distributions that are derived from Ubuntu will be able to take advantage of these updates such as Mint, Elementary, and many more.
This is exciting news since the Nvidia drivers will come pre-baked into the LTS versions of Ubuntu (Goodbye, Nouveau!) which should make for a smoother out-of-box experience when you install Ubuntu. For most users, it will be perfectly fine to rely on the Nvidia drivers provided by the SRU. These drivers have been qualified by Canonical as stable, so most should wait for it to be pushed out in a SRU.
How do I get the latest Nvidia drivers?
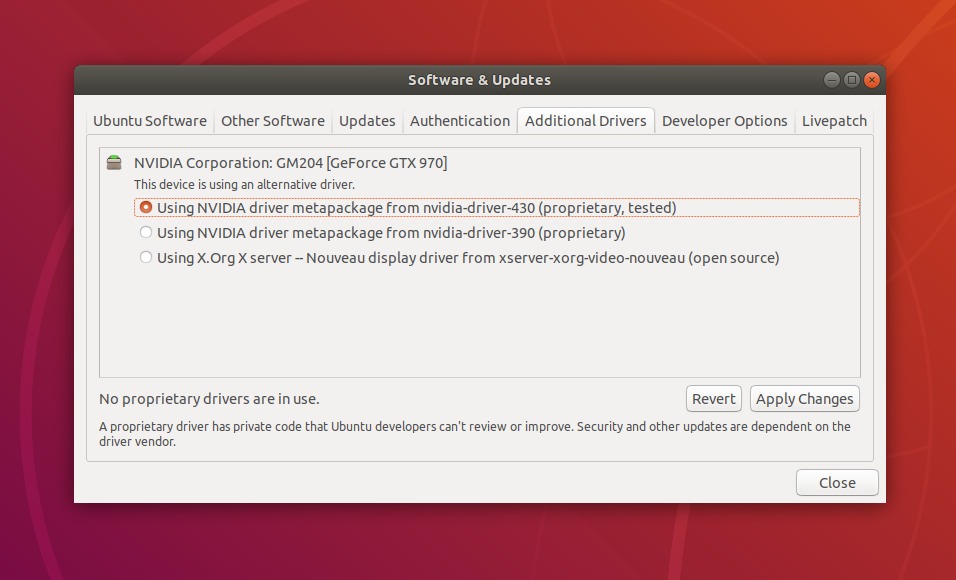
Since the latest Nvidia drivers are available through Ubuntu, it is as easy as opening up “Software & Updates” and enabling “Using NVIDIA driver metapackage…” under “Additional drivers.” Once you have completed the above steps, you will be good to go! While the drivers included in the SRU should be stable, there is never a 100% guarantee that you will not run into any issues. The SRU drivers are not always the most up-to-date drivers available for your video card, so for the users who require the latest and greatest drivers might not want to wait for an SRU release. That is why it is always good to know how to install the Nvidia drivers from the PPA.
The first step to installing the latest Nvidia drivers from the PPA is to open up a terminal. I typically do this by pressing “Ctrl + Alt + T,” but you can also open by clicking on the terminal icon from within the GUI, or right-clicking on the desktop and selecting the terminal in the drop-down menu.
Once the terminal is open, you will want to add the PPA by entering the following command:
sudo add-apt-repository ppa:graphics-drivers/ppa
After you have added the PPA, you will want to the below “apt-get” command to update your packages list:
sudo apt-get update
With your packages list updated, you will want to check to see which Nvidia drivers are recommended for your video card. You can do this by entering:
ubuntu-drivers devices
This command may take a while to produce output. There may be several entries that are displayed here, we will want to use the driver version that has been flagged as “Recommended.” Now that you have identified which driver that you want, you will install it by entering:
sudo apt-get install nvidia-driver-xxx
It will ask if you would like to continue, type “y” in the terminal and hit enter to complete the installation of the driver. Once it has been completed, you will want to reboot your system. You can do so through the GUI, but I find it is easier to just enter:
sudo reboot
Need help with your Puget Systems PC?
If something is wrong with your Puget Systems PC, we are readily accessible, and our support team comes from a wide range of technological backgrounds to better assist you!
Looking for more support guides?
If you are looking for a solution to a problem you are having with your PC, we also have a number of other support guides that may be able to assist you with other issues.
