Table of Contents
Why you need this article
Recording your screen is useful for a litany of tasks. Maybe you’re training your team, creating a tutorial, or just grabbing a quick snippet to share with colleagues. With Windows 10 and the Xbox Game Bar, you can quickly, simply, and intuitively capture a recording without installing any 3rd party software or configuring any special settings.
While the Xbox Game Bar was originally designed to record video game clips, it’s currently hugely useful for any kind of video capture.
Prerequisites
In order to support screen recording, your system (specifically Graphics Processing Unit or GPU) must support one of three encoding technologies: Nvidia NVENC, AMD VCE, or Intel Quick Sync H.264. Most Puget built systems will support these without any intervention, but it depends on your hardware. Contact Puget Systems Support if by the end of this article you aren’t able to use the recording software. Generally speaking, a system built after 2010 will support this functionality.
If you would like to verify you have one of these technologies:
1. Open Device Manager
2. Select Display Adapters
This dropdown will show which brand of graphics you have and as long as it is either Nvidia, AMD, or Intel; chance are it will work.
Windows 10 Xbox Game Bar is automatically installed and enabled, but if you have never launched a game on this system, it’s worth double checking that Microsoft has initialized the Game Bar.
1. Select the Start menu
2. Type Settings and select the first option
3. Select Gaming in the new window
4. Check that the Xbox Game Bar option is set to On
Bear in mind that Xbox Game Bar is only able to record one application window at a time and is unable to record Windows Desktop or File Explorer.
Recording
Let’s get right to it. The Xbox Game Bar will record the last screen you were accessing, and you are not able to switch to another application once recording has begun. You are not able to record your entire screen, so it’s best to maximize whichever window you wish to record. If the screen you want to record is a game, that’s usually already maximized, but if it’s something like Premiere Pro, you will need to make sure. There are a lot of options and features to explore before you get started, so take some time to poke around.
To record your screen:
1. Launch the application you wish to record. Close or minimize other applications to avoid accidentally capturing the wrong one. Make sure any audio (Spotify/Youtube) is turned off as the Game Bar is able to record the entire system's audio. Even though it only records one window at a time, it will record all audio playing on the system.
2. Press the Windows key + G to open Xbox Game Bar
Selecting the microphone button will enable external audio recording so you can add a voiceover while you record.
3. When ready, click the Record button to start recording. You could instead press Windows + Alt + R to start recording without opening the Xbox Game Bar
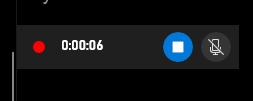
A small pop-up bar with a timer and two recording controls (stop recording and external microphone)
4. When finished recording, click the Stop button or press Windows + Alt + R
5. You will see a "Game Clip Recorded" notification, and you can select it to quickly open the corresponding folder or navigate to the Captures folder in Videos on your C drive (This PC > Videos > Captures)
Congratulations!
You've just recorded your first video! Now, share with your colleagues and friends. Microsoft's Xbox Game Bar is so wonderfully easy to use that it's hard to even consider using anything else for quick screen/application recordings. Record yourself performing an action that you'd like to teach or maybe just demo a process that your team will use regularly, either way the Xbox Game Bar provides a super simple interface for recording processes that should help facilitate a number of your business practices. While the Xbox Game Bar is not as feature rich as some of the other dedicated recording software, it's far simpler to use and takes little to no configuring.
Need help with your Puget Systems PC?
If something is wrong with your Puget Systems PC, we are readily accessible, and our support team comes from a wide range of technological backgrounds to better assist you!
Looking for more support guides?
If you are looking for a solution to a problem you are having with your PC, we also have a number of other support guides that may be able to assist you with other issues.
