Table of Contents
Why you need this article
Encountering issues with hardware devices is a common challenge for Windows 11 users, but fear not, as understanding and leveraging the capabilities of the Device Manager can be a game changer in troubleshooting. At the heart of resolving many hardware problems is the ability to diagnose and alter device settings effectively within this powerful tool. Particularly, for the perplexing ‘This device is Disabled (code 22)’ error, the solution often lies in a few simple yet decisive steps that can be performed within the Device Manager. In this guide, we’ll embark on an educational journey through enabling disabled devices and updating drivers to ensure your computer’s hardware regains its full functionality without a hitch.
Understanding Device Manager
Unleashing the Power of Device Manager in Windows 11: Your Hardware Command Center
Windows 11 hasn’t just stepped up the game with its sleek design and usability features—it’s also packed with powerful administrative tools that keep tech aficionados in control of their computing environment. Device Manager stands out as a pivotal element in the Windows ecosystem that adeptly manages your hardware devices. Here’s the lowdown on what Device Manager is and how it ensures every piece of hardware plays nice with your cutting-edge Windows 11 setup.
What Exactly is Device Manager?
Think of Device Manager as the central nerve center for all the hardware on your Windows machine. This in-built utility is the go-to spot for tech enthusiasts who want to keep close tabs on their device’s components. Device Manager serves up a comprehensive list of all installed hardware, conveniently categorized for easy navigation. It’s the bridge between your operating system and the various pieces of hardware that make up your computer—each with its language and protocols.
How Does Device Manager Work Its Magic?
The magic of Device Manager manifests through its ability to let users:
- View and Update Drivers: Tech savants know that outdated drivers can wreak havoc. Luckily, Device Manager allows you to update, roll back, or uninstall drivers. This keeps your gadgets communicating in top form and your performance optimal.
- Enable/Disable Hardware: Power users toggle hardware on or off without physically messing with the internals. Temporarily disabling a malfunctioning network card or webcam? Done in a few clicks.
- Troubleshoot: No need to be Sherlock—Device Manager highlights problematic devices with warning icons. Run built-in troubleshooters or adjust configurations to solve the mysteries.
- View Properties: Crave details? Right-click on any device, select ‘Properties,’ and view a device’s status, driver details, resources, and more.
So, How Do You Leap Into Action With Device Manager on Windows 11?
To launch Device Manager, you can:
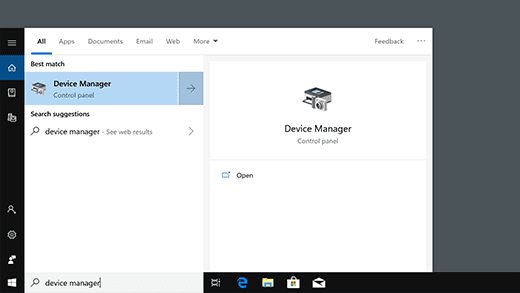
- Use the Search Bar: Click the magnifying glass on the taskbar, type “Device Manager,” and select the top result.
- Access Through Settings: Head to ‘Settings,’ choose ‘System,’ then ‘About,’ and click ‘Device Manager’ under ‘Related settings.’
- Power User Menu: Right-click the Windows icon or press Win + X, then select ‘Device Manager.’
Once you’re in, you’re at the heart of hardware management. But remember, with great power comes great responsibility. Tinkering with Device Manager requires a steady hand and a clear head. Casual users should tread cautiously, as incorrect changes can lead to hardware misbehaviors.
It doesn’t matter whether you’re warding off driver demons or configuring components; Device Manager is an essential utility for those vested in maintaining a smooth-operating Windows 11 system. Navigate with confidence, update with precision, and keep your tech fortress running without a hitch. Unleash the full potential of your hardware through the mastery of Device Manager—where every click is a step towards optimal performance.
Enabling a Disabled Device
Anticipating a seamless experience with Windows 11, a disabled device displaying the dreaded ‘This device is Disabled (code 22)’ error can prove to be a noticeable impediment. Fear not—rectifying this problem is typically straightforward and requires a series of logical steps within the familiar realms of Windows systems administration.
First and foremost, understanding the cause of the error is paramount. Often, ‘code 22’ is an indicator that the device was manually disabled in Device Manager. Perhaps it was an oversight or a dabbling experiment gone awry; regardless, re-enabling it is the clear path forward.
Commencing the process involves navigating to Device Manager. Use the search function by pressing ‘Windows + S’ and type “Device Manager,” or right-click on the Start button and select it from the menu. Once there, a list of hardware categories will be at your disposal.
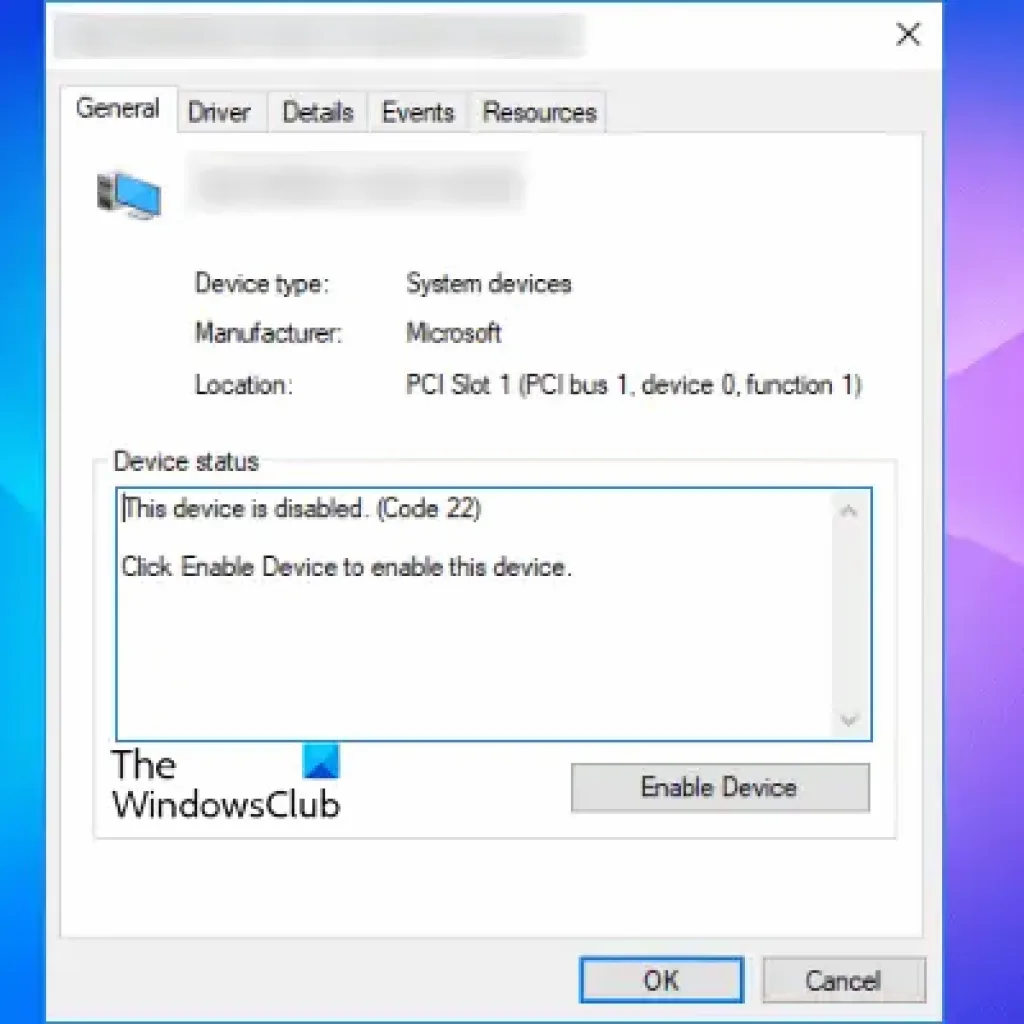
Scan through the list and identify the disabled device—it will usually have a small black arrow indicating its status on the icon next to its name. Double-click on the device to drill deeper and uncover additional specifics. This action brings up the properties window, detailing the current state alongside a host of other technically rich information.
The crucial element is the ‘General’ tab where the device status is noted. To re-enable the device, simply click on the ‘Enable Device’ button—if it’s grayed out, move on to the ‘Driver’ tab and click ‘Enable’ there.
Occasionally, this maneuver alone doesn’t suffice. If so, updates to the driver could be the key to unlocking functionality. Windows 11 provides the facility to search automatically for updated driver software—initiate this by clicking ‘Update Driver’ within the ‘Driver’ tab. Let Windows scour for and install any discovered updates.
Persistence is vital. Should Windows fail to identify a new driver automatically, consider visiting the device manufacturer’s website. Manufacturers often host a library of drivers for their products; locate and install the relevant software manually.
On the off-chance that an update doesn’t correct the issue, a rollback of the driver might be in order. If a recently installed update precipitated the error, reversing to the previous version can do the trick. This is done with the ‘Roll Back Driver’ button, though it’s only enabled if there indeed was an update to reverse.
In some scenarios, the error could be linked to broader system issues, and a device’s disablement is symptomatic of underlying problems. Running Windows updates or deploying system restore points can transcend the scope of Device Manager, addressing these deeper issues.
The deft use of Device Manager, coupled with additional measures listed, constitutes a robust response to the ‘This device is Disabled (code 22)’ error. At all times, remain cognizant of the potential for changes to affect system stability. Should anything take a turn for the worse, Windows System Restore serves as a vital recovery tool.
With logical troubleshooting and precise adjustments, re-enabling a disabled device in Windows 11 should be within the grasp of any tech enthusiast. A methodical approach will typically lead the way out of the code 22 labyrinth.
Updating Device Drivers
Keeping device drivers up-to-date is not just about squeezing out the latest features from your hardware – it’s primarily about security, performance, and stability. An outdated driver can cause conflicts with other hardware or software, leading to system crashes and decreased performance.
Here’s a step-by-step guide on how to keep drivers updated in Windows 11, an essential troubleshooting strategy:
- Identify Problematic Devices: Use the Device Manager to pinpoint malfunctioning hardware. Look for yellow exclamation marks which suggest issues with the respective devices.
- Check Driver Status: Once you’ve located a problematic device, right-click it and select “Properties”. Click the “Driver” tab to review the driver status. If the driver is outdated or corrupted, issues will likely arise.
- Update Drivers: Within the “Driver” tab, hit “Update Driver.” You can search automatically for updated driver software, which allows Windows to look online for the latest driver. If Windows finds an updated driver, follow the on-screen instructions to install it.
- Manual Update: If Windows doesn’t find a new driver, visit the device manufacturer’s website to download the latest driver. Then use the “Browse my computer for drivers” option to navigate to and install the driver you’ve downloaded.
- Automated Tools: For tech enthusiasts who find manual updates a bit tedious, software like Windows Update or third-party tools can automate the process, scanning for and applying the latest drivers regularly.
- Backup Current Drivers: Before updating drivers, consider creating a backup. Third-party software can help create driver backups. Should a new driver cause issues, having a backup ensures you can revert to the previous state.
- Forced Driver Updates: Sometimes devices might require drivers that Windows Update doesn’t provide. In such cases, use the manufacturer’s installation program or manually pick a driver by using the “Have Disk” option.
- OEM Software: For those using devices from a singular manufacturer, OEM software (like Dell Update or HP Support Assistant) can streamline driver updates.
- Check for Generic Drivers: At times, third-party or generic drivers can provide a temporary fix if the manufacturer’s drivers are causing issues. However, always strive for the official drivers for full functionality and support.
- Reboot After Updates: Post driver update, rebooting the device ensures that changes take full effect.
By regularly updating your drivers, you ensure that your hardware runs with improved compatibility and minimal issues. Tech enthusiasts know that the latest drivers can mean the difference between optimal performance and a frustrating tech hiccup. Remember, maintaining updated drivers is a proactive measure, reducing the need for troubleshooting down the road. And with that proactive stance, your device is always in prime condition, ready to tackle any task with peak efficiency.

Conclusion
Navigating the complexities of device management in Windows 11 does not have to be an intimidating endeavor. By mastering a few critical functions within the Device Manager, you can swiftly bring disabled devices back to life and keep your system in sync with the latest driver updates. Armed with the knowledge of how to enable devices and ensure their drivers are up to date, you’ll have the skills to maintain the seamless operation of your computer’s hardware. Remember, a proactive approach to managing and updating your devices is not just about solving the immediate ‘This device is Disabled (code 22)’ error—it’s about fostering a robust and reliable computing environment for the long term.
Need help with a Puget System?
All Puget Systems computers come with lifetime technical support. Our support team is readily accessible and comes from a wide range of technological backgrounds to better assist you!

Looking for self-guided help?
Regardless of whether your computer was built by Puget Systems or not, if you are experiencing a problem with your workstation or server we have a large library of public support articles that you may find helpful.