Table of Contents
Windows 11 is here, and it brings some amazing features including: a redesigned Start button, new File Explorer, new Taskbar options, and more. All these exciting features make us want to try out Windows 11. As of October 5th 2021, Microsoft has officially released Windows 11 and after extensive testing Puget Systems is comfortable recommending it.
This is a step-by-step guide on how to install Windows 11, NOT UPGRADE. This means you will format your primary (C:) drive so make sure you back up any important data before proceeding. Data Backup
System Requirments
Before installing, make sure your system meets the minimum specifications and requirements for install.
Check out this article for details
The minimum system requirements for installing Windows 11 are listed here on Microsoft Site.
- Processor: 1 gigahertz (GHz) or faster with 2 or more cores on a compatible 64-bit processor System on a Chip (SoC)
- RAM: 4 gigabyte (GB)
- Storage: 64 GB or larger storage device
- System firmware: UEFI, Secure Boot capable
- TPM: Trusted Platform Module (TPM) version 2.0
- Graphics card: Compatible with DirectX 12 or later with WDDM 2.0 driver
- Display: High definition (720p) display that is greater than 9” diagonally, 8 bits per color channel
- Internet connection and Microsoft accounts: If you’re running Windows 10 Home edition, then you need to have Microsoft Account to install it. Learn How to Install Windows 11 Home without Microsoft Account or Internet Connection
Getting Started
Fortunately, Microsoft has now officially released the ISO Images of Windows 11 so you should download them directly from Microsoft.
Instructions for the “Windows 11 Install USB creation tool” can be found HERE
Select “Create Windows 11 installation media”
There are several ways to create a bootable installation media for Windows 11 but using the aforementioned tool provided by Microsoft is the best and simplest way.
One time boot from USB
To boot to the USB thumbdrive from the boot option menu, you can refer to the below legend depending on your motherboard manufacturer. Repeatedly tap the key corresponding to your motherboard below to access the menu. Select the inserted Windows 10 thumbdrive from the populated list, let the system boot from the USB then jump down to step 1 below.
Boot Option Menu Keys
- ASUS: F8
- Gigabyte: F12
- MSI: F11
- ASrock: F11
MSI and Gigabyte Boot Option screens
Depending on your system, you may see both a UEFI and Legacy boot option in this menu. If supported, we recommend selecting and installing in UEFI mode (Make sure to contact your PC manufacturer to confirm this)
Proceed with the Install
1. At the Windows Setup screen, enter your preferred language, time, currency, and other details as asked; finally, click Next.
2. Click on Install now on the next screen (as shown below).
3. Enter your product key
The two options you have are ‘Upgrade‘ and ‘Custom‘. We recommend using the ‘Custom‘, also known as a ‘Clean install’ option. We advise always performing a complete backup of all files and applications before starting the ‘Custom’ install. Check out our backup advice in our article about “Backup Options Within Windows 10” and our “Recommended 3rd Party Backup Solutions for Windows 10″
4. Select Custom: Install Windows only (advanced) to perform a clean install. This will erase all data, so make sure you backed up all your data.
Now you’ll get this wonderful screen! So this is where you select which drive to install Windows on. In earlier versions of Windows, you might need to click the “Drive Options (advanced)” button to get all of these helpful choices. This part is where you need to be really careful if you’ve got a drive with important data on it. Disconnect any external drives to be safe. Before you do anything, BACKUP ANY IMPORTANT DATA BEFORE TOUCHING A THING HERE. Seriously, if you do this wrong, you’ll lose any pictures, music, movies – anything you’ve got. In the example here, there’s only one hard drive. By default, Windows makes more than one partition on the drive and one is always called “System Reserved”. You will need to delete ALL partitions on the drive we are installing Windows on. In our example it is Drive 0, but this may not be the same for your system and you will want to match the drives total size (add up the partitions sizes) with what you expect your drive to be. For example, a 2TB drive will show up as around 1800MB.
5. Select each Partition and then click ‘Delete’ until you have ‘Drive # Unallocated space’ like below step 9. You will see a message like the one immediately below, Select ‘OK’ in order to proceed
6. Click the “Unallocated Space” leftover and click ‘Next‘!
7. Once the above steps have been completed, your windows installation will begin, then go through a couple of different screens, and multiple reboots. You will see this screen during the process:
Out of Box Experience
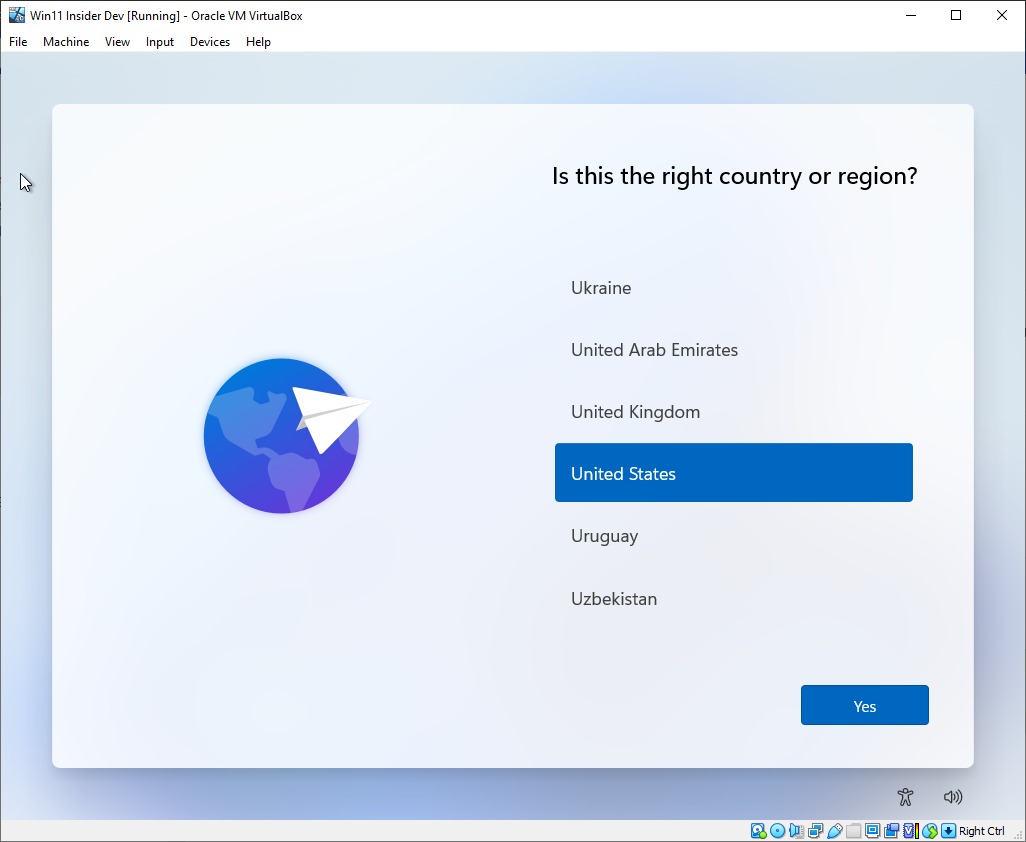
Once the installation has finished, you will now be directed towards this screen:
That’s it! Now Windows will finish fully installing and you just need to go through Microsoft’s ‘Out of Box Experience’ to get it fully set up and ready for use. Check out our Windows 10 Puget Systems Out of Box Experience article or Windows 11 Puget Systems Out of Box Experience article for more details though your screen design/color will differ slightly until we update that article.
Need help with your Puget Systems PC?
If something is wrong with your Puget Systems PC, we are readily accessible, and our support team comes from a wide range of technological backgrounds to better assist you!
Looking for more support guides?
If you are looking for a solution to a problem you are having with your PC, we also have a number of other support guides that may be able to assist you with other issues.
