Table of Contents
Why You Need This
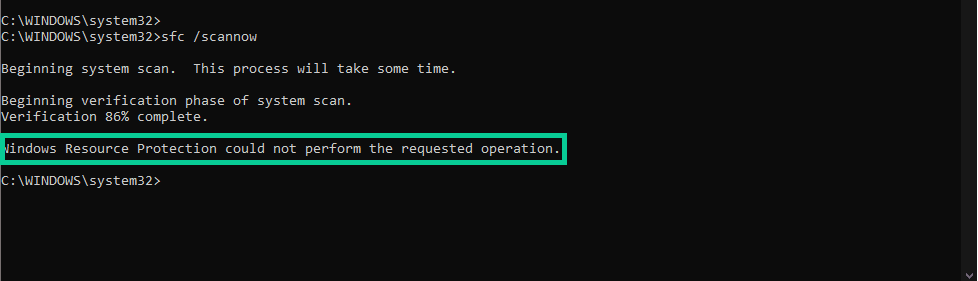
In the event that you encounter a Windows error, such as a BSOD, your initial recourse is typically to utilize the System File Checker. However, what course of action should you take if running an SFC scan results in an error?
Automated resolution of various computer errors is possible through the employment of SFC Scannow. Regrettably, the functionality of this tool may occasionally become unstable. The “Windows resource protection could not perform the requested operation” error is the most frequently encountered problem during the use of the system file checker. See below:
While we have run into this error several times, the single most common solution is a full Windows Reset, fair warning. Still worth trying the other possible solutions
First Off, What Even Is Resource Protection
Windows Resource Protection (WRP) is a feature of the Windows operating system that helps to safeguard critical system files, folders, and registry keys from unauthorized modification or deletion. WRP maintains a cache of known good system files, and when necessary, it replaces any missing or damaged files with cached copies to maintain system stability.
SFC (System File Checker) is a tool that is part of Windows Resource Protection. SFC scans the Windows system files and compares them to the cached copies stored in the WRP cache. If it detects any missing, damaged, or modified system files, it replaces them with the cached copies to ensure system stability.
The relevance of WRP to SFC is that SFC relies on WRP to maintain a cache of known good system files. Without WRP, SFC would not be able to function correctly, as it would not have a reliable source of pristine system files to use as a reference for comparison. In short, WRP and SFC work hand-in-hand to ensure the stability and integrity of the Windows operating system.
This SFC error may arise for several reasons. Frequently, conflicts with other Windows components may trigger the issue. Alternatively, attempting to scan the hard drive using the “scannow” command can also result in the error (most common in our experience).
LINK TO SFC ARTICLE?
Solution 1 – Safe Mode
Try running the scannow command in safe mode using our article and the instructions below:
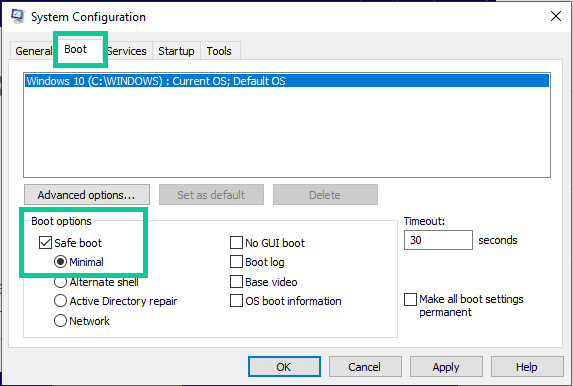
To enable safe mode from inside Windows 10, follow these steps:
- Press the Windows key + R to open the Run dialog box.
- Type “msconfig” and hit Enter to open the System Configuration utility.
- In the System Configuration window, click on the “Boot” tab.
- Under the “Boot options” section, check the box next to “Safe boot” and select the type of safe mode you want to enable: “Minimal” (standard safe mode), “Alternate shell” (safe mode with command prompt), or “Active Directory repair” (safe mode for domain controllers).
- Click “Apply” and then “OK” to save the changes and exit the System Configuration utility.
- A prompt will appear asking if you want to restart your computer now or later. Choose “Restart” to immediately restart your computer and boot into safe mode.
Once your computer has booted into safe mode, repeat the steps to run SFC scan and see if it is successful.
Solution 2 – Check Disk / ChkDsk
Using a diagnostic tool to fix a diagnostic tool 🙂
Chkdsk (short for “check disk”) is a built-in Windows 10 command-line tool that scans and checks the file system and disk for errors and repairs any issues it finds. Specifically, chkdsk checks the integrity of the file system, checks for bad sectors on the hard drive, and fixes any logical file system errors it encounters.
When run with the /f parameter, chkdsk will attempt to fix any errors it finds on the disk.
- Open File Explorer and navigate to the drive that you want to scan.
- Right-click on the drive and select “Properties” from the context menu.
- In the Properties window, click on the “Tools” tab.
- Under the “Error checking” section, click on the “Check” button.
- If you’re prompted to do so, select the option to scan and repair the drive.
- Depending on the size and health of the drive, the scan may take several minutes to complete. You can monitor the progress in the “Scanning and repairing drive” window.
- Once the scan is complete, you’ll see a message indicating whether any errors were found and repaired. If any errors were found and repaired, it’s a good idea to restart your computer to ensure that the changes take effect.
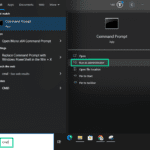
Alternatively, you can also run Checkdisk from the Command Prompt using the chkdsk command. To do so:
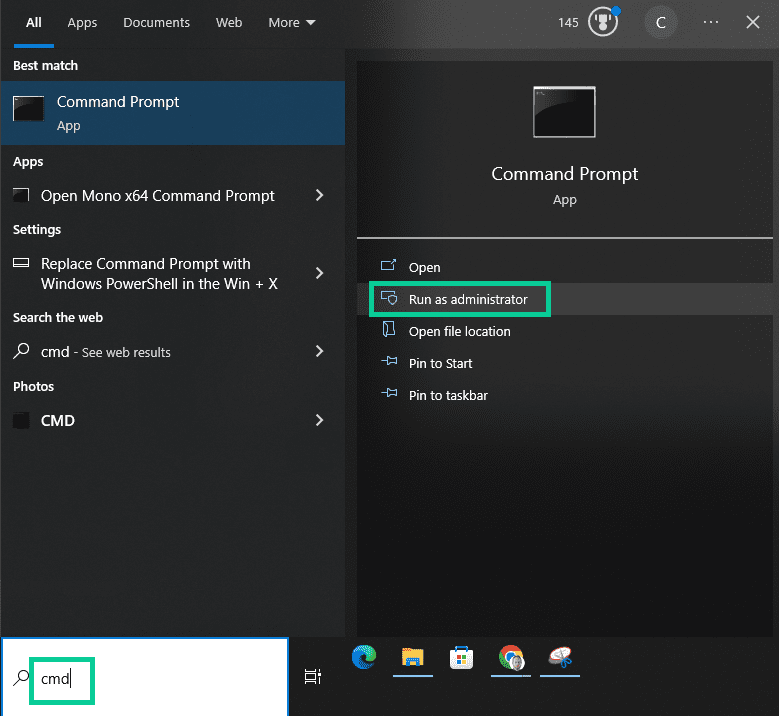
- Open the Start menu and type “cmd” into the search bar.
- Right-click on “Command Prompt” and select “Run as administrator” from the context menu.
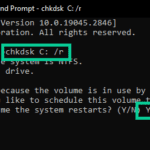
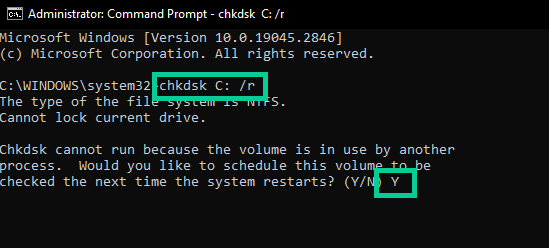
- In the Command Prompt window, type “chkdsk C: /f” (replace “C:” with the drive letter you want to scan) and hit Enter to start the scan.
- If you’re prompted to do so, type “Y” to schedule the scan for the next time you restart your computer.
Once the scan is complete, you’ll see a message indicating whether any errors were found and repaired. Again, it’s a good idea to restart your computer to ensure that the changes take effect.
System Image
Solution 3 – Automatic Repair
Windows 10 Automatic Repair is a built-in feature that helps diagnose and repair issues that prevent Windows from starting up properly. This tool attempts to diagnose the problem and then fix it automatically. It can run a variety of tests, such as repairing the Master Boot Record (MBR) or rebuilding the Boot Configuration Data (BCD) file.
Unfortunately, Windows 10 Automatic Repair cannot be initiated from within Windows itself (although the steps to get there CAN be done from within Windows)
If you are currently logged into Windows, save any open files and close all running programs.
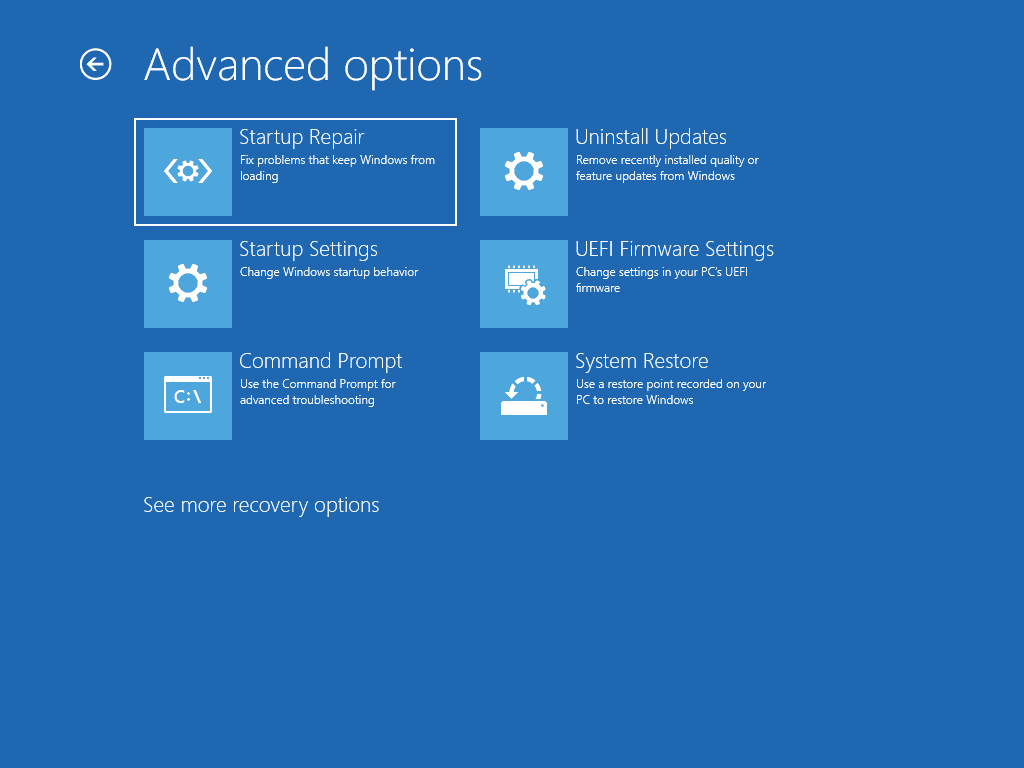
- Select the Start menu, click on the Power button, and hold the Shift key while clicking on the Restart option.
- This will restart your computer and bring up the Advanced Startup Options menu.
- From this menu, choose the Troubleshoot option.
- Then choose the Advanced Options menu.
- Select the Automatic Repair option.
Windows will start diagnosing your computer for issues, and attempt to fix them automatically.
Solution 4 – Module Installer
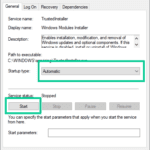
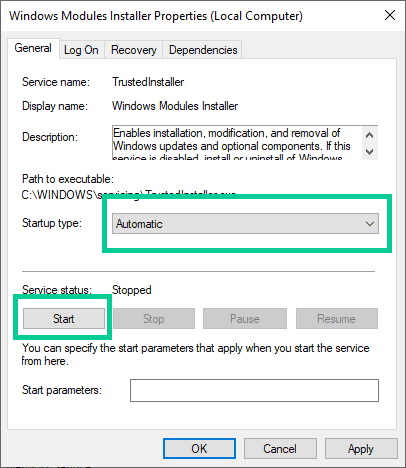
The Windows Module Installer is a Windows service that enables the installation, modification, and removal of Windows updates and optional components. Here are the steps to enable the Windows Module Installer:
- Press the Windows key + R to open the Run dialog box.
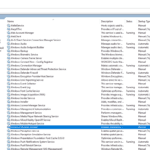
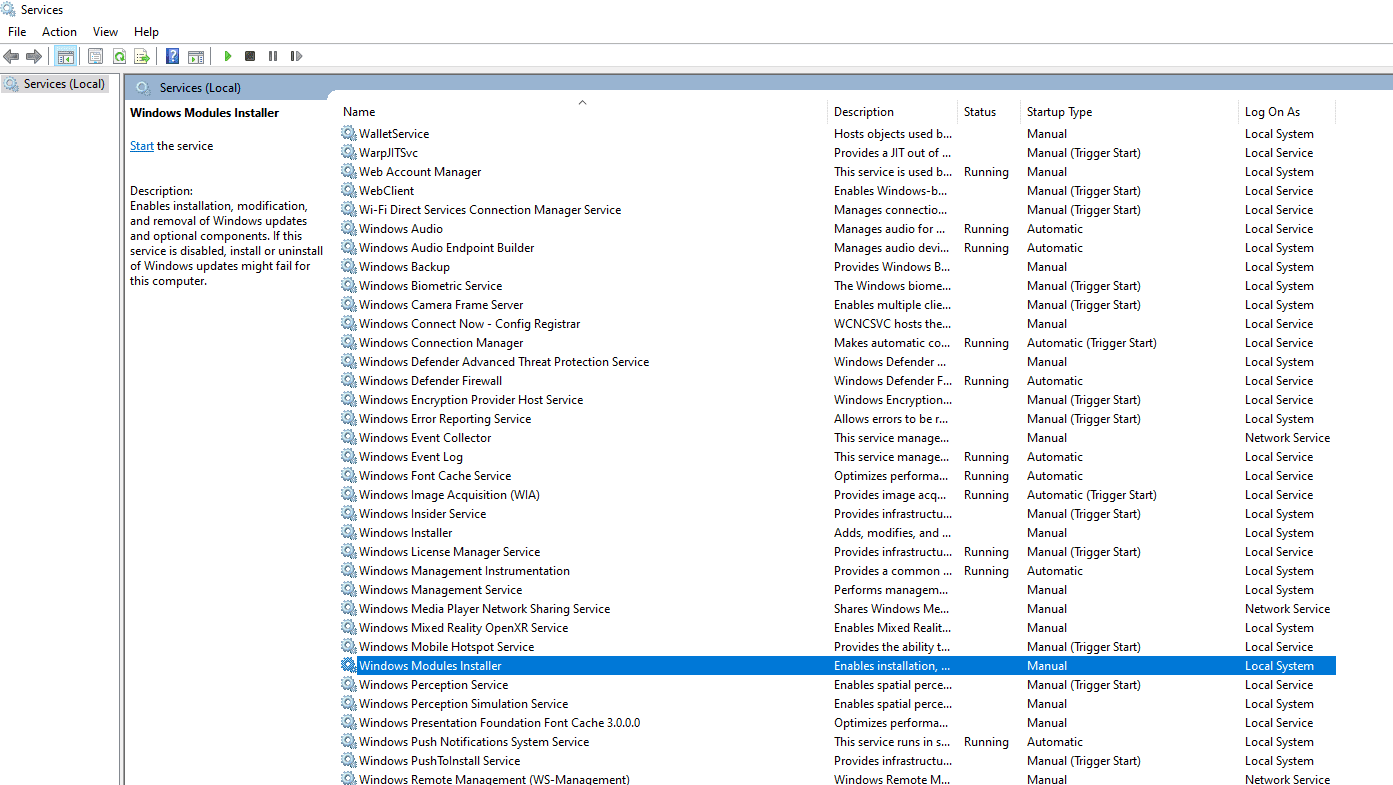
- Type “services.msc” in the box and press Enter. This will open the Services window.
- Scroll down and locate the Windows Module Installer service.
- Double-click on the Windows Module Installer service to open its properties window.
- Set the startup type to Automatic, if it’s not already set.
- Click the Start button to start the service if it is not already running.
- Click the Apply button and then the OK button to save the changes.
- Close the Services window.
System Image
Once you’ve enabled the Windows Module Installer service, you should be able to use the System File Checker (SFC) and other Windows diagnostic tools without encountering the “windows resource protection could not perform the requested operation” error.
Solution 5 – System Restore
Here are the steps to perform a System Restore from within Windows 10:
- Open the Start menu and type “system restore” in the search bar.
- Select “Create a restore point” from the search results.
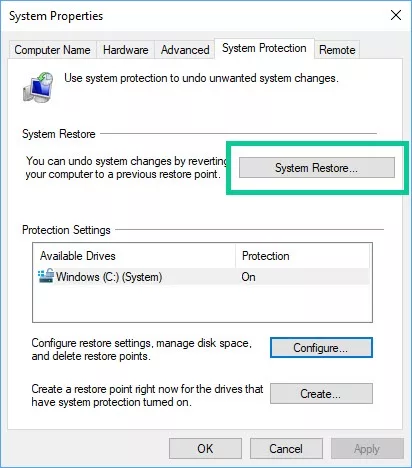
- In the System Properties window, click the “System Protection” tab.
- Click the “System Restore” button to open the System Restore wizard.
- Select the restore point you want to use from the list. You can also click the “Scan for affected programs” button to see which programs will be affected by the restore.
- Click the “Next” button and then the “Finish” button to start the restore process.
Your computer will restart and the restore process will begin. This may take several minutes to complete.
Once the restore process is complete, your computer will restart again. Check to see if the issue you were experiencing has been resolved.
It’s important to note that System Restore will not affect your personal files, but it may uninstall programs or updates that were installed after the restore point you selected. Additionally, you can undo the System Restore if it doesn’t resolve the issue or causes new problems.
Solution 6 – Reset Windows
Reinstalling Windows 10 may seem like a daunting task, but it’s often the best solution when you’re experiencing repeated errors and Blue Screen of Death (BSOD) issues. Here are a few reasons why a reinstallation may be necessary:
- Eliminates software-related issues: Over time, the accumulation of software and driver installations, updates, and uninstalls can cause conflicts that lead to errors and crashes. Reinstalling Windows 10 can clear out all the old and potentially problematic software, starting fresh with a clean installation.
- Resolves hardware issues: Sometimes hardware issues can cause errors and crashes. Reinstalling Windows 10 gives you the opportunity to identify and fix any hardware problems during the installation process.
- Saves time: Troubleshooting and fixing repeated errors and BSODs can be a time-consuming process. Reinstalling Windows 10 may take a bit of time, but it’s often quicker than trying to diagnose and fix each issue individually.
- Improves performance: A fresh installation of Windows 10 can often improve overall system performance, as it removes any bloatware or other programs that may be slowing down your system.
Overall, reinstalling Windows 10 may be the best solution to resolve repeated errors and BSODs. It can eliminate software-related issues, resolve hardware problems, save time, and improve overall system performance.
For detailed instructions on the Reset pocess, follow our article here – Windows 10 Reset
Conclusion
In conclusion, encountering the “Windows resource protection could not perform the requested operation” error while using the SFC tool can be frustrating, but there are several steps you can take to resolve the issue. These include running SFC in Safe Mode, using the Command Prompt to run SFC, running CHKDSK, enabling the Windows Module Installer, performing a System Restore, and as a last resort, reinstalling Windows 10. By following these steps, you can overcome the error and successfully use the SFC tool to scan and repair any issues with your system’s protected files.
Need help with a Puget System?
All Puget Systems computers come with lifetime technical support. Our support team is readily accessible and comes from a wide range of technological backgrounds to better assist you!

Looking for self-guided help?
Regardless of whether your computer was built by Puget Systems or not, if you are experiencing a problem with your workstation or server we have a large library of public support articles that you may find helpful.