Table of Contents
Introduction
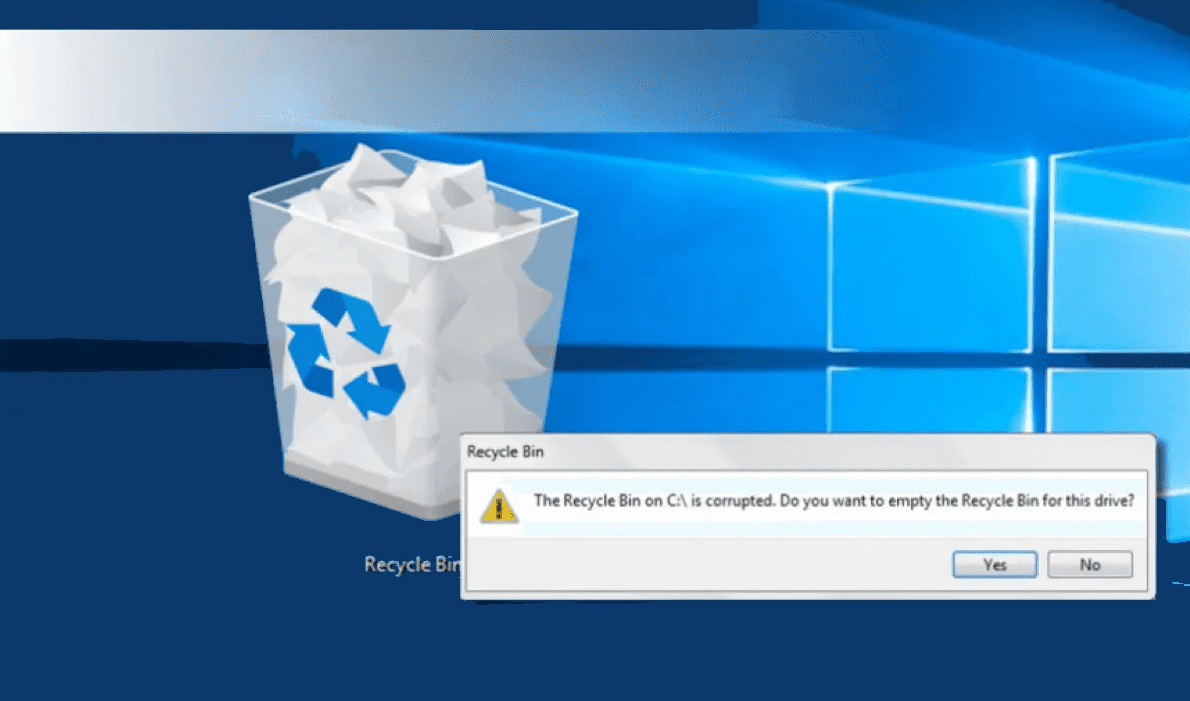
When it comes to maintaining the integrity of our digital workspace, understanding the tools and utilities provided by our operating systems is crucial. The Recycle Bin in Windows 10 and 11 is more than just a temporary storage for deleted items; it’s an essential component designed to protect our data and give us a chance to recover files we might have mistakenly removed. Still, like any other computer system, the Recycle Bin is not immune to issues. A corrupted Recycle Bin can be a source of frustration, preventing you from restoring important files or even from deleting items properly. But fear not—becoming familiar with the steps to diagnose and repair a corrupted Recycle Bin can restore order to your digital environment and bring peace of mind.
Understanding the Recycle Bin
Demystifying the Windows Recycle Bin: Your Digital Safety Net
Ever had that heart-stopping moment when you realize you’ve accidentally deleted something important from your computer? Fear not, friends, because the trusty Recycle Bin in Windows is like your digital safety net, catching those files you might have prematurely bid farewell. Understanding how this pivotal feature works will save you a lot of panicked moments, so let’s dive right in.
At its core, the Recycle Bin is a special folder where the majority of deleted files on your Windows computer temporarily reside. It acts as a buffer zone before the final deletion occurs. Think of it as the purgatory for files and folders, giving you a chance to resurrect them if you change your mind or realize an error.
Here’s the scoop on how it operates:
- Deleting Files and Folders: When you delete a file or folder (usually by pressing the ‘Delete’ button or using the context menu), it’s moved to the Recycle Bin. However, this excludes files deleted from removable drives and files that are too large, as per the Bin’s size limit settings.
- Viewing Contents: To see what’s in the Bin, just double-click its desktop icon. You’ll get a list of deleted items along with information like the original location, date of deletion, and size.
- Restoring Files: Changed your mind? Right-click the file within the Recycle Bin and select “Restore”. Voilà – it’s sent back to its original location as if nothing ever happened.
- Permanent Deletion: If you’re certain you no longer need an item, you can permanently delete it from the Recycle Bin. Right-click the file and choose “Delete”. Remember, this action isn’t easily reversible, so ensure you’re absolutely sure.
- Emptying the Recycle Bin: To free up more space on your hard drive, you can empty the entire Bin. Just right-click the Recycle Bin icon and select “Empty Recycle Bin.” A prompt will ask for confirmation, given the gravity of the action – all items will be permanently deleted.
- Recycle Bin Settings: Want to tweak how the Recycle Bin works for you? Right-click the Recycle Bin icon, choose “Properties”, and you’ll find options such as setting the maximum size of the Bin or configuring it to skip the Bin entirely, instantly permanently deleting files (though use this last option with extreme caution).
The Recycle Bin’s simplicity is part of its beauty; it’s incredibly user-friendly and doesn’t require constant attention to do its job effectively. Plus, it offers some peace of mind knowing that you have a second chance to recover files you might have mistakenly let go.
Just remember that whilst the Bin can hold quite a bit, it’s not a bottomless pit. Regularly check and manage its contents – an overstuffed Recycle Bin can hog precious storage space. And always keep in mind, once the Bin is emptied or files are permanently deleted, those files typically become much harder to recover, often requiring specialized software or professional assistance.
So there you have it, a straightforward rundown of the Windows Recycle Bin—your fail-safe against unintended data loss. Keep it in mind the next time you’re on a deleting spree, and manage your digital files with confidence. Cheers to less “Oh no!” and more “No problem,” as you wield the power of the Recycle Bin to keep your digital workspace tidy and error-free.
Using Command Prompt to Reset the Recycle Bin
Alright, let’s roll up our virtual sleeves and dive into fixing a corrupted Recycle Bin using the Command Prompt.
Encountering a corrupted Recycle Bin on your Windows PC can be a minor hiccup, but don’t sweat it—this is where the Command Prompt comes into play as a handy tool. So without further ado, here’s your step-by-step guide to resolve the issue:
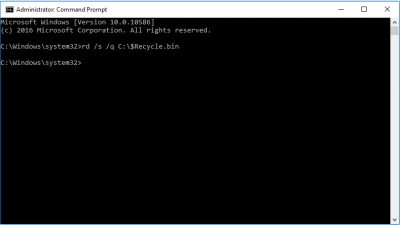
- Open Command Prompt as Administrator:To start, we’ll need to open the Command Prompt with administrative privileges. You can do this by typing
cmdinto the search bar and right-clicking on ‘Command Prompt’. Then choose ‘Run as administrator’. A user account control prompt may appear; if it does, simply click ‘Yes’ to proceed. - Use the RD (Remove Directory) Command:Now that you’ve got the Command Prompt open with the necessary permissions, type the following command:
rd /s /q C:\$Recycle.binYou’ll want to replaceC:\with the letter of the drive where the Recycle Bin is located if it’s not on C. This command removes the Recycle Bin folder and all of its contents, which is essentially the corrupted part that needs resetting. - Confirm the Deletion:After executing the rd command, there will be no confirmation message; it will simply return to the command prompt if successful. This is perfectly normal.
- Restart Your PC:Once you’ve removed the corrupted Recycle Bin, restart your computer. This is an important step as it will allow Windows to recreate the Recycle Bin folder afresh.
- Check Your Recycle Bin:After the system boots up, check to see if the Recycle Bin is functioning properly. You can do this by deleting a small, unneeded file and ensuring it moves to the Recycle Bin. Then, try to restore or delete it from within the Recycle Bin.
Voila! Your Recycle Bin should be back in action, ready to handle your deleted items once more. Remember, the Command Prompt is a powerful tool, so treat it with respect and ensure you’re entering commands as precisely as possible.
Keep this handy tip in your back pocket for a rainy day, and rest easy knowing that a corrupted Recycle Bin is but a minor inconvenience easily remedied with a few keystrokes.

Checking Disk for Errors
Alright, let’s dive into how checking your disk for errors can play an essential role in fixing a corrupted Recycle Bin on your Windows system. When the Recycle Bin becomes corrupted, you might notice errors or it may not function properly. This corruption can occur due to a variety of reasons, ranging from system crashes to disk write issues. Fortunately, Windows includes a built-in tool, Check Disk (chkdsk), which can find and fix file system errors and could be the linchpin to resolving Recycle Bin woes.
When you execute Check Disk, the tool scans your hard drive for errors and bad sectors. It corrects any file system metadata issues it encounters, which might include the data related to your Recycle Bin. By repairing these problems, Check Disk ensures that the file system adheres to its necessary structure and function, potentially reviving your Recycle Bin back to health. Follow these steps to run the Check Disk utility:
- Open the ‘Command Prompt’ as an Administrator. To do this, type “cmd” in the Windows search bar, right-click on ‘Command Prompt’, and select ‘Run as administrator’.
- Before running Check Disk, it’s best practice to ensure that you close any open applications to prevent data loss. Save your work and proceed when you’re ready.
- In the Command Prompt window, type the following command and then press Enter:
chkdsk /f C:(where ‘C’ is the letter of the drive where your Windows is installed and Recycle Bin resides. Replace ‘C’ with the appropriate drive letter if your circumstances differ). - If the disk is in use, Check Disk will display a message asking if you want to schedule the disk check to be carried out the next time the system restarts. Simply type “Y” for ‘Yes’, and press Enter.
- Restart your computer to initiate the disk check. Upon reboot, you’ll see a screen showing the progress of the scan and repair process. It may take some time, depending on the size and condition of your hard drive.
- Once the system boots up after the Check Disk operation, take a moment to observe the Recycle Bin for normal operation. Files should be able to be deleted, restored, or permanently removed without error messages or unexpected behavior.
If the Recycle Bin is still acting up after running Check Disk, there might be an issue that requires more advanced troubleshooting techniques or professional assistance. But in many cases, Check Disk can iron out the kinks that are leading to Recycle Bin’s malfunction, restoring its functionality and keeping your system on track.
Conclusion
Mastering the methods to troubleshoot and resolve a corrupted Recycle Bin on Windows 10 and 11 not only enhances your technical skillset but also fortifies the health of your computer system. Taking proactive measures such as regularly checking your hard drive for errors and understanding how to reset the Recycle Bin when issues arise will ensure that you’re equipped to protect your valuable data. The steps provided offer you the control to quickly rectify the situation, letting you get back to your important tasks with minimal disruption. By investing this effort into your system’s maintenance, you demonstrate a strong commitment to the smooth and efficient operation of your computing environment—a true hallmark of a savvy Windows user.
Need help with a Puget System?
All Puget Systems computers come with lifetime technical support. Our support team is readily accessible and comes from a wide range of technological backgrounds to better assist you!

Looking for self-guided help?
Regardless of whether your computer was built by Puget Systems or not, if you are experiencing a problem with your workstation or server we have a large library of public support articles that you may find helpful.