Table of Contents
Intro
Windows updates can be incredibly beneficial to a system's performance and stability; however, Microsoft has not had the best track record recently so in this article we will be covering how you can temporarily pause Windows updates. The hope here is that you will be able to pause the updates just long enough to give Microsoft time to work out all the major bugs and kinks, so by the time the pause releases, you are getting the most stable and functional version of the update.
Microsoft unfortunately has severely locked down the ability to pause updates; however, in a coming update (Spring update), there will be significantly more robust update pause capabilities. This article will be updated once that update is live and released to the public. So let's dive right in!
Option 1 – Scheduling a restart
Windows 10 automatically downloads and installs updates to make sure your device is up to date. To finish installing the update, your device will need to restart. If you're asked to restart your device while you're busy using it, you can schedule the restart for a more convenient time:
Step 3:
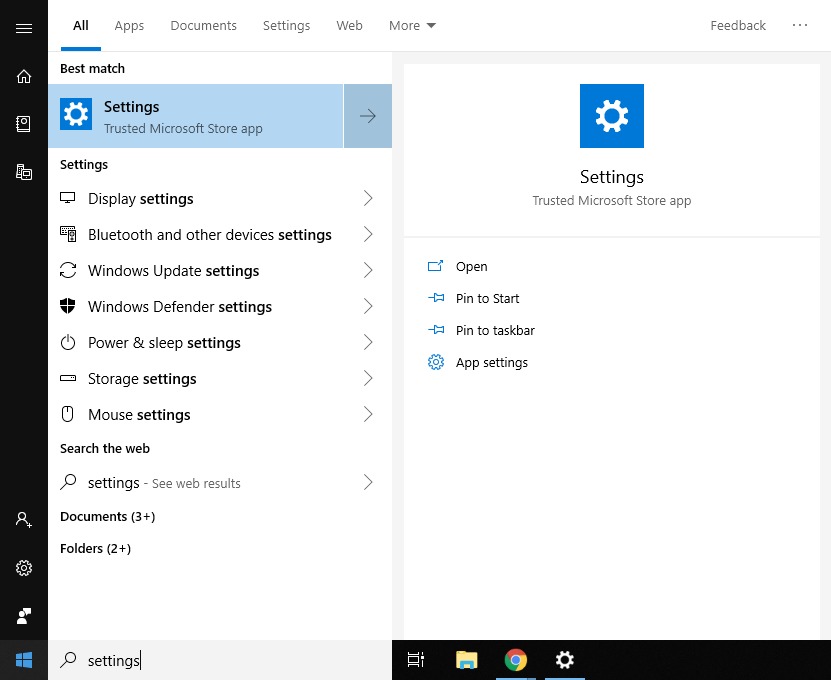
The best match should be "Settings", select this with a standard left click
Step 6:
If you have the option to "Schedule a restart" you can select it here. If no updates require a restart you will not see this option:
Step 7:
Pick a time that works well and is convenient to your work schedule. As mentioned in Step 6, if you do not currently have an update pending restart you will instead have the option to adjust active hours. These are the hours that Windows acknowledges you are working and will 'try' not to interrupt you
Step 8:
Confirm the selection and close the window. That's it, now Windows will restart per your scheduled time OR will notify you of new updates outside of your standard operating times
Option 2 – Pausing updates
The following steps will guide you through the process of pausing Windows 10 updates using the current version of Windows. As I mentioned, this will be changing when the Spring update has been released to the public so we will update this article at that time. This option is only available in Windows 10 Pro which all Puget Systems computers are bundled with, we do not use home, enterprise, education or any other version.
Step 3:
The best match should be "Settings", select this with a standard left click
Step 6:
On this screen you will see the option highlighted in red "Advanced Options", select this and a new window will open with a number of different options
Step 7:
In the new Window you will see an array of options to choose from but we are looking for the highlighted one "Pause updates". You will also see below the radial button a message similar to the one in this image (Pausing now will pause updates until XX/XX/XXXX). This tells you how long the updates are currently allowed to be paused and while currently you can only pause for a short time, when the Spring update finally releases you will have more options and more time
Step 8:
Select the radial to toggle it "On". Close this window and now updates are paused until the aforementioned date. That's it! Windows updates are now paused for an extended time hopefully allowing Microsoft time to work out all issues before you allow the update through
Need help with your Puget Systems PC?
If something is wrong with your Puget Systems PC, we are readily accessible, and our support team comes from a wide range of technological backgrounds to better assist you!
Looking for more support guides?
If you are looking for a solution to a problem you are having with your PC, we also have a number of other support guides that may be able to assist you with other issues.
