Table of Contents
Table of Contents
| Component Removal | Component Installation |
Introduction
This guide is intended for the Puget V752i/V552i, but also applies to the Sager NP6350/NP6370 and the Clevo/Pro-Star W350ETQ/W370ET. While the 15" and 17" models are obviously different, beyond the screen size and physical size of the units the differences are almost all cosmetic. So while the images used in this guide may not exactly match your laptop if you have a 15" laptop, they should be very, very close.
If you have a laptop purchased from Puget Systems, we highly recommend contacting our support department prior to replacing any components.
Battery Removal
|
|
|
| Move the locking clip to the unlocked position | Push the battery release towards the center of the laptop. This will require a bit of force as it pushed the battery upwards |
|
|
|
| Lift the battery from the top and remove it from the laptop. |
To reinstall the battery, see the Battery Installation section of this article.
Keyboard Removal
If you need to replace the keyboard or access the WiFi card or third RAM slot, follow the instructions below. Before doing any work in a laptop, we recommend disconnecting the power brick and removing the battery.
|
|
|
| With a thin screwdriver inserted in the gap between the PgUp/PgDn keys and the bezel, gently pry up the bezel. You want to primarily focus on pushing the bezel towards the screen with only minimal force lifting it up. | Once the end of the bezel has been lifted up, begin pivoting the bezel up from the side closest to the screen. Once the catches on the screen side of the bezel detach, the front side will come loose by itself. |
|
|
|
| Once the entire top is detached, you can remove the bezel from the laptop. | Unscrew the five screws holding the keyboard in place |
|
|
|
| Lift the keyboard up from the corner with the PgDn key and flip it over onto the laptop's palm rest area. |
If you merely need to access the WiFi card or third RAM slot, you can proceed to do so at this point. If you are removing the keyboard with the intent of replacing it, continue following the steps below.
|
|
|
|
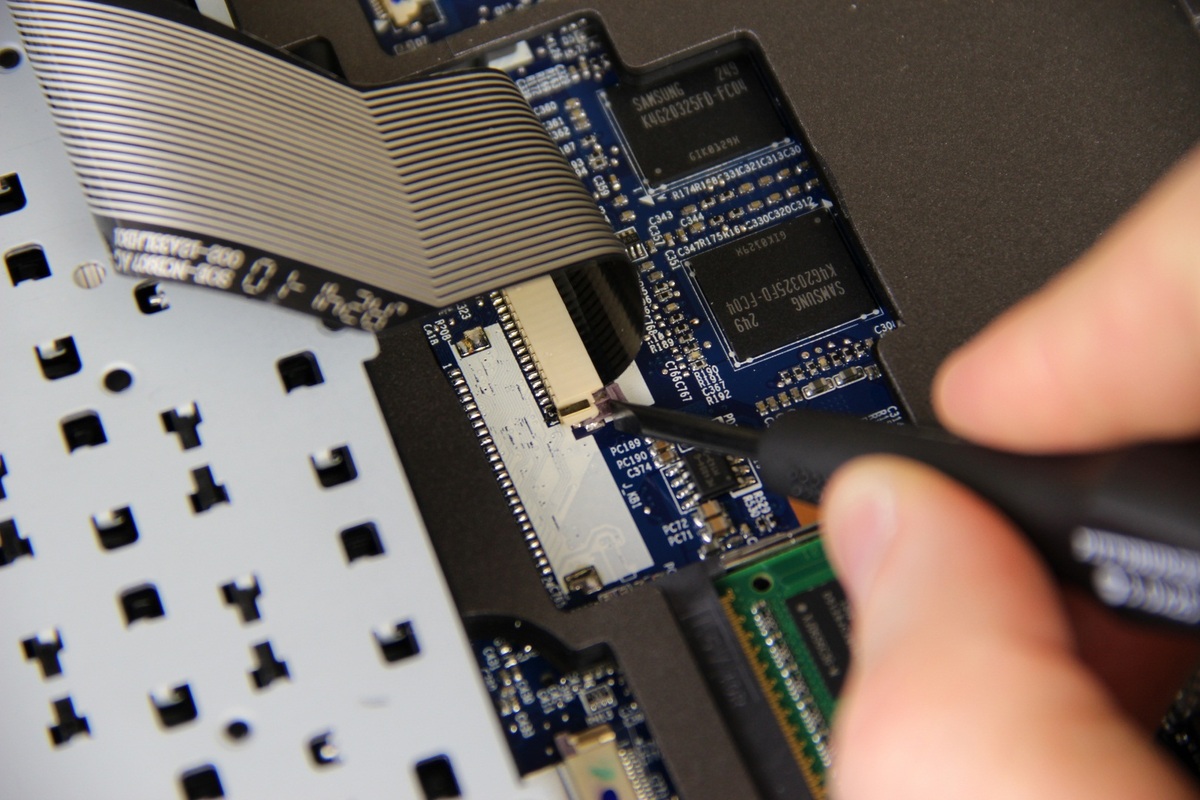
First locate where the keyboard's ribbon cable connects to the laptop |
On either side of the cable is a brown pin. With a small screwdriver, push this pin towards the laptop's screen. Do this for both sides |
|
|
|
| With the pin loosened, you can pull the cable towards the laptop's screen and remove the keyboard from the laptop |
To reinstall the keyboard, see the Keyboard Installation section of this article.
Back Panel Removal
The back panel encloses the primary hard drive, CPU, and the first and second RAM sticks.
|
|
|
| Remove the three screws that secure the back panel in place | Slide the panel back about a quarter of an inch |
|
|
|
| Lift the panel up and away from the laptop. |
To reinstall the back panel, see the Back Panel Installation section of this article.
Primary Hard Drive Removal
Before doing any work in a laptop, we recommend disconnecting the power brick and removing the battery. To access the area that the primary hard drive is located in, first remove the back panel.
|
|
|
| Remove the two screws that secure the hard drive in place | Grasp the plastic handle and slide the drive back about a quarter of an inch |
|
|
|
| Lift the drive up and away from the laptop. |
To reinstall the primary hard drive, see the Primary Hard Drive Installation section of this article.
RAM 1&2 Removal
Before doing any work in a laptop, we recommend disconnecting the power brick and removing the battery. To access the area that the first and second RAM sticks are located in, first remove the back panel.
|
|
|
| Gently pull apart the two clips that hold the RAM in place. The RAM will pop up when the clips have been moved | Grasp the edge of the stick and remove it from the slot by pulling at a 45° angle towards the CPU heatsink |
|
|
|
| Repeat this process for the second stick |
To reinstall the first and second RAM sticks, see the RAM 1&2 Installation section of this article.
RAM 3 Removal
Before doing any work in a laptop, we recommend disconnecting the power brick and removing the battery. To access the area that the third RAM stick is located in, first remove the keyboard.
|
|
|
| Gently pull apart the two clips that hold the RAM in place. The RAM will pop up when the clips have been moved sufficiently | Grasp the edge of the stick and remove it from the slot by pulling at a 45° angle towards the laptop's screen |
|
|
|
To reinstall the third RAM stick, see the RAM 3 Installation section of this article.
Secondary Hard Drive Removal
Before doing any work in a laptop, we recommend disconnecting the power brick and removing the battery.
|
|
|
| Remove the single screw holding the cover in place | Slide the cover down about a quarter inch, then lift and remove it from the laptop |
|
|
|
| Grasp the plastic over the hard drive and firmly pull it directly towards you to unseat it from its socket | Lift the drive out to remove it from the laptop |
To reinstall the secondary hard drive, see the Secondary Hard Drive Installation section of this article.
Optical Drive Removal
Before doing any work in a laptop, we recommend disconnecting the power brick and removing the battery.
|
|
|
| Remove the single screw holding the optical drive in place | Using a small screw driver or paperclip, manually eject the drive |
|
|
|
| Fully extend the drive tray, then continue pulling gently to remove the drive from the laptop | If you are replacing the optical drive, you will need to move the mounting bracket to the new drive by removing the two screws shown |
|
|
|
| The faceplate will also need to be moved to the new drive. To do so, first depress the clip shown and gently separate the faceplate from the drive | Depress the clip on the other side of the drive to fully remove the faceplate |
To reinstall the optical drive, see the Optical Drive Installation section of this article.
CPU Removal
Before doing any work in a laptop, we recommend disconnecting the power brick and removing the battery. To access the area that the CPU is located in, first remove the back panel.
|
|
|
| First unscrew the four screws labeled 1-4 in order. These screws will loosen, but are designed to not be removed from the heatsink | Unscrews the next three screws labeled 5-7 in order. These screws are completely removable |
|
|
|
| Grasping the two plastic tabs, gently rock the heatsink side to side to loosen the bond between the CPU and the heatsink then remove it from the laptop | With the heatsink removed, clean the CPU and GPU first with a clean paper towel, then with isopropyl alcohol if possible. |
|
|
|
| Rotate the screw that locks the CPU in place 90 degrees counter-clockwise to unlock the CPU | Lift the CPU directly up and remove it from the laptop |
To reinstall the CPU, see the CPU Installation section of this article.
WiFi Card Removal
Before doing any work in a laptop, we recommend disconnecting the power brick and removing the battery. To access the area that the WiFi card is located in, first remove the keyboard.
|
|
|
| Using either a small screwdriver or simply your fingernails, pop off the connected antenna | Remove the single screw holding the card in place. The card will pop up when the screw is removed. |
|
|
|
| Remove the card by pulling it at a 45° angle towards the center of the laptop |
To reinstall the WiFi Card, see the WiFi Card Installation section of this article.
Battery Installation
|
|
|
| Set the side of the battery with the rubber foot into the battery mount | Pivot the battery and press down until it clicks into place |
|
|
|
| Move the locking clip into the locked position | |
Keyboard Installation
If you are replacing the keyboard, follow all of the instructions below. If the keyboard has not been fully disconnected and was just moved to gain access to the RAM slot or WiFi card, skip ahead to the second half of this section.
|
|
|
|
Insert the ribbon cable into the slot making sure that the brown pin is pushed out |
Push the brown pins on either side in with either a small screw driver or your fingernail. Ensure that the cable does not back out while doing so |
|
|
|
With the keyboard attached, you can proceed to finish installing the keyboard.
|
|
|
| Flip the keyboard up and, making sure that the tabs along the bottom of the keyboard are seated, pivot it down onto the laptop | Reinstall the five screws that hold the keyboard in place |
|
|
|
| Position the bezel in place with the edge closest to the keyboard being installed first | Press down along the top of the bezel until it clicks into place |
At this point, simply install the battery and the laptop is ready for use.
Back Panel Installation
|
|
|
| Drop the back panel into place about a quarter inch back from its final position | Slide the panel forward about a quarter of an inch |
|
|
|
| Reinstall the three screws that hold the back panel in place |
When this is completed, simply install the battery and the laptop is ready for use.
Primary Hard Drive Installation
Before installing a new hard drive, be sure to move both the plastic mounting bracket and the thin plastic sheet from the old drive to the new one.
|
|
|
| Drop the hard drive into place just below the SATA connector | Slide the drive up until it is fully seated into the SATA connector |
|
|
|
| Reinstall the two screws that secure the drive in place |
When this is completed, install the back panel and battery to complete the hard drive replacement.
RAM 1&2 Installation
|
|
|
| Insert the RAM into the slot at a 45° angle | Gently press down on the RAM until it clicks into place |
|
|
|
| Repeat this process for the second stick |
When this is completed, install the back panel and battery to complete the RAM replacement.
RAM 3 Installation
|
|
|
| Insert the RAM into the slot at a 45° angle | Gently press down on the RAM until it clicks into place |
|
|
|
When this is completed, install the keyboard and battery to complete the RAM replacement.
Secondary Hard Drive Installation
Before installing a new hard drive, be sure to move the thin plastic sheet with the rubber spacers from the old drive to the new one.
|
|
|
| Drop the hard drive into place just below the SATA connector | Slide the drive up until it is fully seated into the SATA connector |
|
|
|
| Drop the cover into place about an eighth of an inch below its final position | Slide the panel into place |
|
|
|
| Secure the panel with the single screw | |
When this is completed, simply install the battery and the laptop is ready for use.
Optical Drive Installation
|
|
|
| Remove the faceplate from the new drive by first depressing the clip shown and gently separating the faceplace from the drive | Depress the clip on the other side of the drive to fully remove the faceplate |
|
|
|
| Install the faceplate that goes with the laptop by simply pressing it onto the drive until it clicks into place | Install the mounting bracket onto the new drive |
|
|
|
| Slide the drive into the laptop | Gently press it into place. The last quarter inch will have a bit more resistance as the drive makes the power/data connection to the laptop |
|
|
|
| Reinstall the single screw to secure the drive in place | |
When this is completed, simply install the battery and the laptop is ready for use.
CPU Installation
|
|
|
| Drop the CPU into place. If it does not fully seat, verify that the locking screw is in the unlocked position | Turn the locking screw 90° while gently holding down the CPU to lock the CPU in place |
|
|
|
| Apply a dot of thermal paste on the GPU and a thin line across the CPU | Only a small amount of thermal paste is necessary as the pressure of the heatsink will spread it across the CPU/GPU |
|
|
|
| Drop the heatsink into place | Reinstall the four screws labeled 1-4 in order. |
|
|
|
| Reinstall the three screws labeled 5-7 in order |
When this is completed, install the back panel and battery to complete the CPU replacement.
WiFi Card Installation
|
|
|
| Insert the WiFi card into the slot at a 45° angle | Gently hold down the card and reinstall the single screw to secure the card in place |
|
|
|
| Reattach the antenna by simply pressing them into place |
When this is completed, install the keyboard and battery to complete the WiFi card replacement.