Table of Contents
Introduction
This article is intended for those who may be new to using software Digital Audio Workstations (DAWs, such as FL Studio or Ableton Live) on Windows or those unfamiliar with ASIO drivers. Music and Audio Production workflows require the delay between key press and audio response to be nearly imperceptible when performing and recording music in a Digital Audio Workstation. The default audio drivers in Windows do not achieve the low latency required to provide a seamless audio response since the audio is processed by multiple Windows services before reaching the hardware, thus creating unnecessary latency. For instance, this can be problematic when using MIDI controllers to play notes into a piano roll. The solution to this problem is to use dedicated audio hardware with its own drivers or a special low-latency audio driver known as an ASIO (Audio Stream Input/Output) driver.
ASIO Drivers and Audio Interfaces
The ASIO driver protocol is specified by Steinberg, and its usage is limited to DAWs that are licensed to support it. This includes most major DAWs such as Ableton Live, FL Studio, Pro Tools, and Cubase. Most external audio device drivers are ASIO drivers. If you use an external Audio Interface, you should not need to install a standalone 3rd party ASIO driver such as ASIO4ALL and can use the audio driver for your device.
ASIO4ALL
If you do not use a dedicated audio interface with its own driver or need a second option for low-latency audio, a common free ASIO driver is available called ASIO4ALL. Instructions on how to enable ASIO drivers in your respective DAW can usually be found in the help pages from the software vendor, but here is how to enable ASIO drivers on some of the major DAWs.
- Ableton Live: Preferences -> Audio -> Driver Type: “ASIO”, Audio Device: “ASIO4ALL v2”
- FL Studio: Settings -> Audio -> Device: “ASIO4ALL v2”
- Cubase: Studio -> Studio Setup -> Audio System -> ASIO Driver: “ASIO4ALL v2”
- Pro Tools: Setup -> Playback Engine -> Device: “ASIO4ALL v2”
- Reaper: Preferences -> Audio -> Device -> Audio System: “ASIO”, ASIO Driver: “ASIO4ALL v2”
Sample Rates and Buffer Size
One more consideration that needs to be made when configuring audio output for the best possible latency while maintaining high-quality audio is Buffer Size and Sample Rate selection. While choosing the correct Sample Rate for your project could be an entire article on its own (one which my engineering experience probably does not qualify me to write) due to the implications it has on sound quality, Buffer Size can be changed without impacting the quality of the sound and simply affects how much audio is processed in a given window of time. Smaller buffers will result in less latency but require more processing power, so finding the right Buffer Size will depend on the power of your CPU and the number of tracks and plugins in your project.
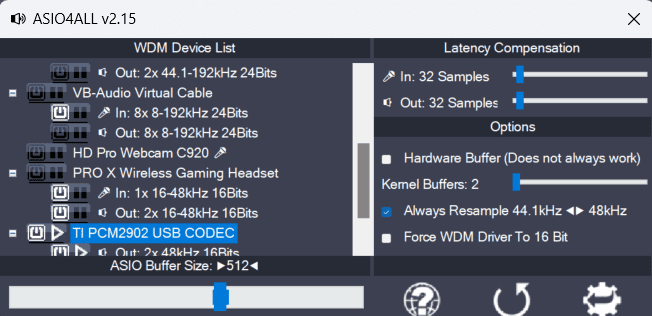
Buffer size can be dialed in via the bar on the lower edge of the ASIO4ALL GUI. This typically defaults to a value of 512.
Conclusion
This guide covered the basics of configuring your DAW to output audio with minimal latency. For general audio issues or issues with system-wide, severe audio latency, check out this guide covering issues such as delayed audio, distortion, popping, complete dropouts, and/or crackling. If you own a Puget Systems PC and have questions about your machine’s hardware or are encountering issues with your system, consider contacting our technical support team.
Recommended Systems for Digital Audio Production:
Need help with a Puget System?
All Puget Systems computers come with lifetime technical support. Our support team is readily accessible and comes from a wide range of technological backgrounds to better assist you!

Looking for self-guided help?
Regardless of whether your computer was built by Puget Systems or not, if you are experiencing a problem with your workstation or server we have a large library of public support articles that you may find helpful.