Table of Contents
In the new version 0.98 of PugetBench for Premiere Pro, we are making significant changes to how we are testing and scoring performance to improve the benchmark’s consistency and accuracy. As these are major shifts, we wanted to provide a full write-up of the reasoning behind each of the methodology changes to explain the reasons behind each.
Export FPS Calculation Method
When exporting a timeline with our benchmark, we use the Sequence.exportAsMediaDirect() function. This works great, except for the fact that it does not return any performance statistics. In previous versions of the benchmark, we solved this by detecting the number of frames exported and dividing that by the time it took the function to complete to calculate the performance in terms of frames per second.
The issue with this method is that it includes not only the export time itself, but also other tasks like the time to create the exporter, read the preset, change the exporter settings, and various other “startup” tasks. In most situations, this doesn’t affect the results much, but in some cases, these additional tasks can take long enough to throw off the final FPS result since we are testing relatively short timelines.
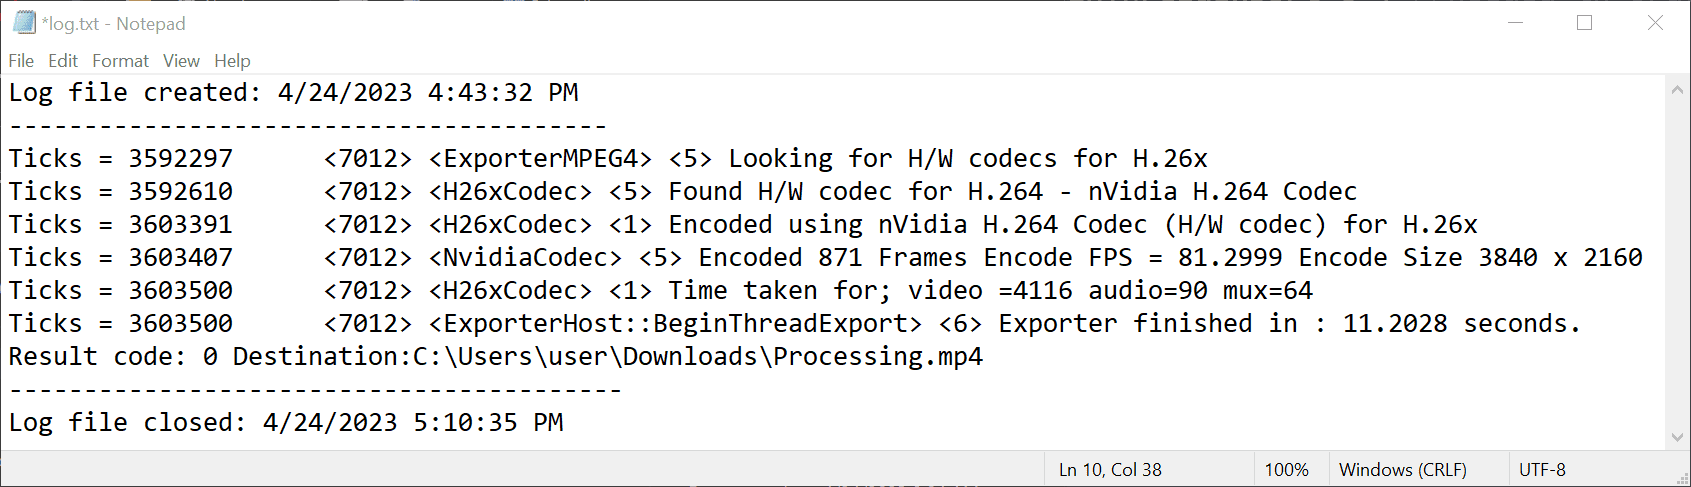
In the 0.98 version of the benchmark, we are switching to reading a Premiere Pro-generated log file that reports the export time without these additional steps. We still calculate the FPS by comparing this time to the number of frames exported, but using the log file time should increase the accuracy of the benchmark results and make them even more applicable to real-world workflows.
Image
In order to use the log file, however, we need to adjust the CreateLogFilesThatDoNotExist and ExporterHost::BeginThreadExport settings, which are needed to create the log file and record the information we need for our benchmark. The CreateLogFilesThatDoNotExist change requires a re-launch of Premiere Pro, and the user is prompted to allow this change and restart Premiere Pro if required. CLI automation has also been added so that this is automatically set for licensed users running the benchmark from the command line.
Score Grouping
In previous versions of our Premiere Pro benchmark, we had an “Overall Score”, as well as “Live Playback”, “Export”, and “Effects” sub-scores. In 0.98, we are keeping the “Overall Score” for those looking for a single performance metric, but the sub-scores are changing from the type of task (Live Playback, Export, and Effects), to be primarily based on the type of codec we are testing:
- LongGOP
- IntraFrame
- RAW
- GPU Effects
We are making this change because, in most cases, the type of codec you are working with is going to be the largest single factor when deciding what CPU and GPU will work best for your workflow. In previous versions of the benchmark, certain CPUs may have given the highest “Live Playback” score, but the actual performance for the end user was not the best due to the type of codec they are working with.
Scoring Calculations
In addition to the change in how we are grouping results, we are also altering how we are calculating the benchmark scores. In previous versions of the benchmark, we compared the raw result to a baseline metric in order to calculate a score for each test, which was then averaged into the various sub-scores.
With 0.98, we are shifting to a geometric mean method for generating the scores. This method helps to normalize the scores so that larger or small results are not unfairly weighted. It also allows for the benchmark to be more flexible and better able to handle large performance shifts due to either application optimizations or the launch of more powerful hardware.
For the actual score calculations, we start by dividing the tests by codec and whether it is an encoding or processing test. A score is generated for each group by taking the geometric mean of all the test results. This score is not logged, and is only used behind the scenes to calculate the major scores.
Test Group Scores (not logged)
LongGOP Encoding Score = geomean (LongGOP Encoding test1, LongGOP Encoding test2, ...)
LongGOP Processing Score = geomean (LongGOP Processing test1, LongGOP Processing test2, ...)
IntraFrame Encoding Score = geomean (IntraFrame Encoding test1, IntraFrame Encoding test2, ...)
IntraFrame Processing Score = geomean (IntraFrame Processing test1, IntraFrame Processing test2, ...)
RAW Processing Score = geomean (RAW Processing test1, RAW Processing test2, ...)
GPU Effects Processing Score = geomean (GPU test1, GPU test2, ...)
These test group scores are then combined into the LongGOP, IntraFrame, RAW, and GPU Effects scores. For LongGOP and IntraFrame, this is done by calculating the geometric mean of the encoding and processing scores. RAW and GPU Effects scores, however, are used as-is since there are no encoding-based tests for RAW or GPU Effects.
These major scores are then combined into the Overall Score. At the moment, we do not weigh any of the major scores more than any of the others, so each contributes equally to the Overall Score.
PugetBench for Premiere Pro Overall and Major Scores
LongGOP Score = geomean (LongGOP Encoding Score, LongGOP Processing Score)
IntraFrame Score = geomean (IntraFrame Encoding Score, IntraFrame Processing Score)
RAW Score = RAW Processing Score
GPU Effects Score = GPU Effects Processing Score

Overall Score = geomean (LongGOP Score, IntraFrame Score, RAW Score, GPU Effects Score)
Dropping Live Playback Tests
With the new benchmark update, we are (reluctantly) dropping all live playback tests. Performance for live playback is by far the #1 concern for most end users, but when benchmarking real-world applications like Premiere Pro, we sometimes run into issues that are not a factor for the typical end user.
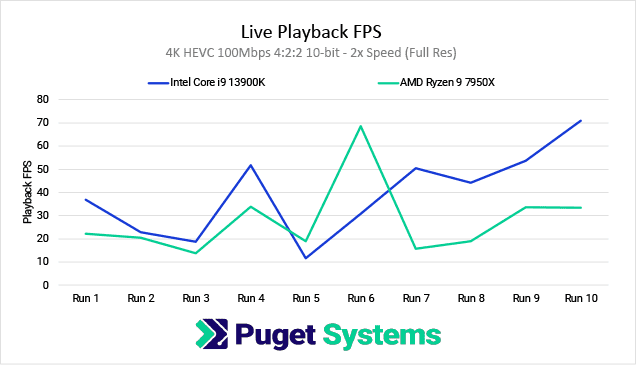
In our case, the problem we have been running into is run-to-run consistency. In a typical scenario, an end user is going to want to be able to play a timeline without dropping any frames. However, for a benchmark, we need to make the timeline difficult enough that even the most powerful workstation will drop frames. If we did not, we could have an Intel Core i3 and a Core i9 CPU that both play back a 24FPS ProRes 422 timeline with no frame drops, but that doesn’t mean the Core i3 is as capable as the Core i9 once you add in multiple streams and higher FPS/resolution clips.
In the past, we stressed the system by playing a high FPS timeline at more than 1x, 2x, and 4x speeds. This gave us multiple levels of difficulty and allowed more powerful CPUs to show their benefit. However, as a system is pushed beyond its capability and starts dropping frames, Premiere Pro has a number of optimizations that kick in in order to try to give you the smoothest playback possible.
This kind of optimization is terrific for end users and is exactly what you want to happen. Unfortunately, the problem from a benchmarking standpoint is that they don’t always kick in at the same time. In one playback run, they could start after half a second. On another run, it could take 2-3 seconds. As you can imagine, that makes it difficult to get consistent results, especially since we ideally want to focus on the performance at the start of playback, which is often a bigger concern than playback over longer periods.
Image
The end result is that for some tests, we can see massive run-to-run inconsistencies. The good news is that we were running enough individual tests that the results averaged out to the point that the Overall Score usually only shifted a few percent between runs. But, the deeper into the tests you go, the more the results will change from run to run. And as our benchmarks are increasingly being used for fine performance analysis of Premiere Pro, it has become more and more of an issue.
Alternate Live Playback Testing Methods
In an attempt to combat the run-to-run variation for live playback, we investigated a number of different methods. We could run the test multiple times and take the average (or minimum, or maximum) result, but we found that we would have to run each test at least a dozen times in order to get consistent enough results. That could work for some users, but it would make the benchmark take far too long to run for most.
We also looked into a myriad of ways to disable the live playback optimizations, but it is such a core part of the end-user experience that there is simply no way to get around it that we could find.
Switching from using the number of dropped frames as the basis of our performance metrics to something like the number of streams the system could handle before dropping any frames was another approach we looked into. But, just like running each test multiple times, it resulted in benchmark runs that were far too long. For some codecs, a modern system can handle dozens of streams at once, and every approach we took to nail down exactly the limit for the system ended up taking even longer on average than running the old live playback tests a dozen times. As we got to the limit the system was capable of, we also started to see some of the same run-to-run consistency issues pop up.
In the end (and after a LOT of consideration and work with our partners), we decided that if we wanted to have a consistent and reliable benchmark at the individual test level, we had to find an alternative to using live playback.
New Testing Methodology
After months of work and back-and-forths with our partners, we concluded that the best way to measure performance in Premiere Pro that gives the most real-world metrics for end users was to utilize exporting for all our tests. In the past, we only used exporting to measure encoding performance, but by changing the way we set up our timelines and adjusting the export settings used, we can also use it to test different aspects of Premiere Pro.
Encoding Tests
The easiest thing to test in Premiere Pro is the encoding performance when you are exporting to various codecs. In this situation, we want to minimize the load on the system for decoding the media in your timeline, avoid any CPU/GPU effects, and make the encoding portion of the export as big of a bottleneck as possible.
In order to do this, we are using a DNxHR LB 480×270 clip, scaled up into a UHD (3840×2160) timeline. DNxHR LB is a very easy codec to process (especially at this low resolution), and doesn’t have hardware decoding support on any platform, making it a good baseline codec to use for this test. However, in order to make sure that each pixel is unique and prevent codecs like H.264 or HEVC from getting too “smart”, we are also applying a simple fractal noise PNG image (NOT the fractal noise effect) on top of the clip to ensure that we do not have any repeating pixels.
From this UHD timeline, we export to the range of codecs we want to test encoding performance for and calculate the FPS based on how long it takes relative to the number of frames rendered. While not a 100% pure encoding test (some resources are still being used to process the DNxHR clip, scale it, and process the noise overlay), this is about as close as a pure encoding test that we are able to do in Premiere Pro without getting into highly artificial setups.
In total, we are currently testing the following export codecs:
- H.264 50Mbps 8-bit UHD
- HEVC 50Mbps 8-bit UHD
- HEVC 60Mbps 10-bit UHD
- H.264 50Mbps 8-bit (Software Encoding) UHD
- HEVC 50Mbps 8-bit (Software Encoding) UHD
- HEVC 60Mbps 10-bit (Software Encoding) UHD
- DNxHR LB UHD
- DNxHR SQ UHD
- DNxHR HQX UHD
- ProRes 422 Proxy UHD
- ProRes 422HQ UHD
- ProRes 4444 UHD
If you wish to examine our specific settings, you can download the export presets here.
Processing Tests
On the opposite side of encoding, we also wanted to test how fast Premiere Pro is able to decode different codecs with various CPUs and GPUs. Unfortunately, the best way to test this in a real-world manner is to use live playback, which we can’t currently do for reasons previously explained.
We went through a LOT of different methods to isolate decoding via exporting, but in all the cases that were feasible, the encoding portion of the export process took enough system resources that we didn’t feel comfortable calling it a pure “decoding” test. So, we instead got it as close as we could and settled on changing the name to “processing” in order to help avoid any confusion.
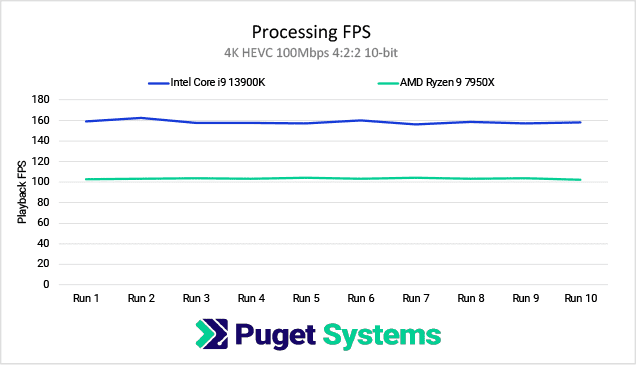
For these processing tests, we are using a wide range of codecs at different resolutions; creating a timeline at the clip’s native resolution. From there, we export each clip to DNxHR LB at HD (1920×1080) resolution. Similar to the encoding tests, we standardized on DNxHR LB for the export codec as it is a very easy codec to process and doesn’t have hardware decoding support on any platform.
The only additional thing we do is to disable the ImporterMPEG.UseSWDecodeWhileEncoding setting, which in the current versions of Premiere Pro disables hardware decoding when exporting. This is done to address stability issues when using hardware decoding and encoding at the same time (which our benchmark is not doing), but since we want to specifically test how good the system is at handling certain media with hardware decoding support, we are disabling this setting when running these tests. It is automatically set back to the default when the tests are finished.
The benchmark results using this method are highly consistent, and accurately reflect the relative performance between two systems when working with different types of codecs. The raw FPS results do tend to be higher than what you will see during live playback / preview since it does not include all the additional steps required for Premiere Pro to show the video in the preview monitor, but we found that the relative performance between two CPUs or GPUs largely aligns with relative performance during live playback.
Image
In addition to the change in the testing method, we are also taking this opportunity to introduce a number of additional codecs in our benchmark. For 0.98, the list of codecs and resolutions we are testing are:
- 4K H.264 150Mbps 4:2:0 8-bit
- 4K HEVC 100Mbps 4:2:2 10-bit
- 8K HEVC 100Mbps 4:2:0 8-bit
- 4K ProRes 422 Proxy
- 4K ProRes 422
- 4K DNxHR LB
- 4K DNxHR SQ
- 4K Cinema RAW Light ST
- 4K ARRIRAW
- 5K Sony X-OCN
- 4K RED
- 8K RED
GPU Effects Tests
Beyond encoding and processing performance of various codecs, we are also making some tweaks to our GPU Effects tests. In previous versions of the benchmark, we tested two “levels” of GPU Effects timelines that had a melting pot of effects applied. This worked great, but we could not analyze how different GPUs performed on a per-effect level.
The solution was to focus on just one GPU-accelerated effect at a time. Of course, many GPU effects (like Lumetri Color) are fairly lightweight, so applying just a single instance isn’t going to stress even a low-end GPU. To address this, we applied each effect anywhere from four, to forty, times.
As a base, we are using a DNxHR LB UHD (3840×2160) clip, and export to DNxHR LB HD (1920×1080) – just like the “4K DNxHR LB” processing test. The difference here is that we also apply the following effects for each test:
- Lumetri Color x40
- Gaussian Blur x40
- Sharpen x40
- VR Digital Glitch x20
- VR De-Noise x4
Notes for the Future
We want to clarify that we 100% believe that live playback performance is the #1 most important thing in Premiere Pro. We may have been forced to drop it from our normal Premiere Pro benchmark, but that doesn’t mean we are going to give up on it. We are continuing to work with all our partners to do what we can to negate the issues we are running into, with the goal of bringing live playback tests back into our main Premiere Pro benchmark.
In the meantime, we are also investigating adding an additional “live playback” benchmark preset for users willing to let the benchmark run for multiple hours. We are not completely sure how this will work, but it will likely need to report the minimum, average, and maximum playback FPS, as well as the variation percentage between runs.
In addition, there are a number of additional features we are actively working on:
- Moving our Premiere Pro (and other benchmarks) to a unified desktop application in order to make it easier to download and use new benchmark versions and assets.
- Applying a score adjuster to bring the Overall Scores of all our benchmarks to a similar level.
- New tests to examine performance for AI-based features like text-based editing, scene edit detection, and more.
- Additional benchmark presets for 3rd party plugins like Red Giant and BorisFX.
In the meantime, you can download the latest version of our PugetBench for Premiere Pro Benchmark here.
PugetBench for Premiere Pro 0.98 Update Notes
- Major update – Results cannot be compared to previous benchmark versions
- Minimum application support changed to Premiere Pro 23.3 due to changes in the Premiere Pro API and performance optimizations.
- Dropping “CPU Effects” tests as most common effects are now GPU-accelerated.
- Dropping live playback tests due to significant issues with run-to-run variation.
- No longer necessary for the preview window to be in a specific quadrant on Windows.
- No longer necessary to change Security & Privacy settings on MacOS or allow Premiere Pro to control system events.
- Changing the “Export” tests to a new “Encoding” test set.
- These new tests focus on the encoding portion of an export.
- The tests are based on a DNxHR LB 480×270 clip upscaled to UHD with an image overlay to ensure each pixel is unique.
- Timeline is exported to a range of codecs at UHD resolution.
- Export codecs include variations of H.264/HEVC (with both software and hardware encoding), DNxHR, and ProRes.
- Adding new “Processing” test set. These are intended to measure how good the system is at processing (with a focus on decoding) different types of codecs.
- Tests are based on a timeline with a range of codecs at their native resolution with no effects applied.
- Timelines are exported to DNxHR LB at 1920×1080. This allows the export to be primarily bottlenecked by how fast Premiere Pro can decode the source media.
- Source codecs include variations of H.264, HEVC, DNxHR, ProRes, RED, Cinema RAW Light, ARRIRAW, and X-OCN.
- Note: This test is an indicator of how good your system is at working with these codecs, but the FPS results is typically higher than what you will see during live playback / preview since it does not include all the additional steps required for Premiere Pro to show the video in the preview monitor.
- Disabling “ImporterMPEG.UseSWDecodeWhileEncoding” setting for the Processing tests. This flag turns off hardware decoding when exporting to protect from current stability issues in Premiere Pro when using hardware encoding and decoding at the same time. We are not using hardware decoding/encoding simultaneously, so the issues are not a concern, and this makes our tests more in-line with behavior when playing media in the preview window.
- Adjusting export FPS measurements to be based on the export time recorded in the Premiere Pro log files. This should be a more “pure” measurement than simply timing how long the export functions in the plugin API take due to additional startup tasks.
- This does require us to enable Premiere Pro logging, which we prompt the user to allow, and requires Premiere Pro to restart.
- Adjusting GPU Effects tests to isolate specific effects rather than applying a melting pot of effects to a single clip. This doesn’t affect the relative scores for GPUs significantly, but allows us to drill down on specific effects during benchmark analysis.
- Changing the major scores (Live Playback, Export, Effects) to be based primarily on the codec being tested rather than the type of test, as that is what most often dictates what type of hardware will be best for different workflows. New major scores:
- LongGOP (H.264/HEVC)
- IntraFrame (DNxHR/ProRes)
- RAW (RED/Cinema RAW Light/ARRIRAW/X-OCN)
- GPU Effects
- Changing all scores to be based on the geometric mean of the individual results (or major scores in the case of the Overall Score). This method helps to normalize the scores so that larger or small results are not unfairly weighted.